So, before we get on to this week's tutorial and sponsor, you'll be wanting to know who won the fab prize from Bee Crafty.... well the randomly chosen winner is ....
congratulations, please email Debbi so she can sort out your prize for you.
This week we have another fabulous prize from our sponsor Fred She Said, and it's Debbi's turn to use one of their images for her tutorial.

You could win $15 to spend in the Fred She Said online store and all you need to do is leave a comment on this post. We'd also appreciate it if you helped to spread the word, but it's not compulsory.
Now, over to Debbi for her image tutorial...
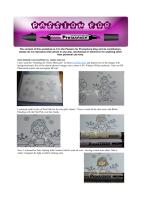
I have used the "Smelling the Cherry Blossoms" set from Fred She Said, and printed one of the images with background and a few of the cherry blossom images onto a sheet of SU Whisper White cardstock. I have an HP Photosmart printer and use regular HP ink)


I coloured small circles of Pale Pink for the wee girl's cheeks,

Then covered all the skin areas with Blush, blending with the Pale Pink over her cheeks

Next, I coloured her hair, starting with Caramel which I used all over - leaving a small area white. This is where I imagine the light would be shining onto.

Then I used Cocoa to cover the whole area - apart from the white area and a small area of the Caramel

The next shade I used was Walnut, which I used on the darkest areas of her hair ie: at the roots and ends.

I went back over all the coloured areas of the hair to blend with Caramel

To colour her kimono, I coloured it using small circular motions over the whole area with Meadow Green, then used small marks of Apple where I imagine the shadowed areas would be. I used the Meadow Green again to blend the darker areas.


I then coloured the kimono trim and her obi (that's the sash of a kimono) with Arctic Blue, laying down more layers for the shaded areas

Moving onto the cherry blossoms, I first dotted some Aubergine into the centres, then blended outwards onto the petals with Pink Carnation

To colour the wall I used Warm Grey 3 and 4, and added some Tan to the stones to give them a bit more texture

And to finish off the background, I used Lilac and Amethyst to colour the mountains, Leaf Green, Apple and Meadow Green for the grass, Leaf Green, Umber and Caramel for the trees and Cool Grey 3 to add a bit of shadow to her tabi socks.

I'll be using this image on my DT card this Tuesday, so look out for it.
Debbi
x