Passion for Promarkers Copyright Notice

The design work, text, photographs and videos on this site belong to ©Passion for Promarkers and each individual designer that contributes to this site. This information is shared to inspire you. All content on this site is not to be used for commercial purposes without explicit permission.
Please do not reproduce these articles in any way, mechanical or electronic for anything other than personal use only. But you may hyperlink to any of the articles giving due credit
Thank you!

Important

Weekend Workshops are published every Friday and all are available in PDF format so you can print out and keep them.

All workshops can be downloaded by clicking the small icon at the end of each post.


..........

Friday 30 April 2010

Weekend workshop #44 - Digi Friday

It’s nearly the weekend so that means one thing………yes it is digi Friday and today we have a fantastic storage solution to show you as well as a tutorial from Gina, before we get to that though we have the very important job of telling you who last weeks winner was, the prize is from DigiStamp Boutique who I know you will agree have some fabulous images. So here we go the winner is ……….
If you could please email Debbi who will get your prize sorted out for you :)
******************
Now onto this weeks sponsor is Lily-Boo's Boutique and the prize is your choice of a collection from the boutique, they have some lovely images so you will be spoilt for choice.
lily-1b
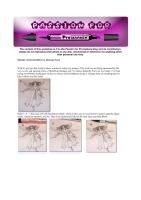
I picked the gorgeous image “fairy with a wand” from the bunches digi set for next weeks challenge, isn’t she just a cutie and would be ideal for lots of challenges. Now I am apologising for the photos straight away, the weather was horrid and so dark
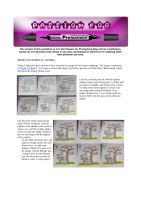
Firstly I decided on which papers I would be using and then got all of my colours together, I used Vanilla and Saffron for the skin, I like go over the area a few times with Vanilla and then use saffron around the hairline for shadow, her cute cheeks were coloured with pastel pink
29042010919 29042010922
Next I did her tights, I wanted to do a solid colour instead of strips so I used amber on the edges and left a white gap in the middle I then used manderin on the edge again to make the edges darker. Next was onto the dress, now with the light coming up above her I wanted the bottom of the dress to be shaded so I used pastel pink for the main dress and then the shadow was cocktail pink, on the picture below it does look very stark so always blend over with the lighter colour over the darker colour to blend the two together.
29042010924 29042010926
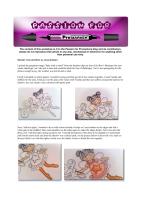
As you can see once it is blended it is nice and fluid, onto the hair now and I used Tan as the base colour
29042010927 29042010928
Then I pick out where I think the darker areas will be and colour with cocoa, again it looks very harsh so go over the area again with tan so the colours blend, you may need to do this a few times to get it how you want, but I can do it half a dozen times just so it looks how I want it too, never be scared of adding more colour. Finally I used carmine to do her frills and used some stickles for the wings and pazzazz of the wand :)
29042010929 30042010931
I hope I have not bored you too much, if you want to see the finished card check out the new challenge which starts on Tuesday. Don’t forget too, that if you want to win some fabby images just leave a comment on this post and you will be entered into the prize draw
Hugs Gina xxx

******************

Now we know how difficult it is to find good storage for our ProMarkers, well Nicky sent us a link to her blog and with Nicky’s permission we are going to show you her fabulous storage solution she has done,


Nicky’s Wording ………
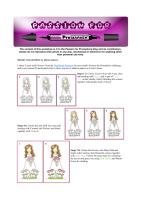
My promarkers have been driving me made as they were in a number of different containers and I never seem to pick up the right container, so I decided I needed to sort it.This is a CD storage box from Tescos (£16.97) it comes with 100 sleeves to put CD in.
Being sad I had some Pro markers in my handbag so was able to try them in the shop for size! Each sleeve holds seven promakers and each section comfortable hold 10 sleeves or eleven with a little bit of a squeeze. As I said I like things very organised or as my DH says OCD!
I used some adhesive labels in my Craft Robo and cut out the little circles this way they were still attached to the backing sheet I could colour them and then peel them off with my poky tool and stick to the ends of the pens, I also have put a coloured circle on the bar of each sleeve (which slides out making this very easy)
In the back of each sleeve I have a little card with the name of the promarker and a square coloured if I have that one. The sheets in the top of the lid come from the Letraset site
The one on the left is a download of the complete range coloured the one on the right is blank with just the names so you can colour in the pens you own and see at a glance which ones you have or haven't got. This fits neatly in the draw of my craft desk is easy to carry around and at last all my promarkers are in one place and easy to see and grab. I can take just one out or if doing shading I can take the sleeves out - the sleeve are already numbered so easy to put back in place!
Like lots of people I craft in the corner of our living room I might put some photos on to give you all ideas on how to craft in small place that have to look tidy when we finished! lol
Hope you like the idea
******************
I think you will all agree it is a fab idea for taking your pens out to crops or just moving from room to room with them, Thank you Nicky for letting us show :)
Wow that was a long post, we hope you enjoyed it and if you have any comments or would just like to say hi we would love to hear from you.
Hugs Gina, Denise and the Design Team xxx

Friday 23 April 2010

Weekend Workshop #43 - Digi Friday

That's been another super quick week, are you ready for another Digi Friday?
A big thankyou to everyone who comments on the workshops, we love to hear your feedback. Maria's tip with the blender pen proved to be a big hit.
So before we show you Michele's tutorial, we had better pick a winner of the Digistamp Boutique prize, and that is...


congratulations, please can you email Debbi to arrange your prize

This Week we are sponsored by Sketching Stamper, and remember you have to be in it to win it. Just leave a comment on this post to be in the draw to win this week's prize - we'd also appreciate it if you helped spread the word on your own blog.

Over to Michele...

Well it's my turn this week to show you how I colour my images. This week we are being sponsored by the very lovely and talented Chris of Sketching Stamper and I've chosen Butterfly Fairy for my image. I've been trying out different techniques on how to colour with ProMarkers to get a Vintage style of colouring and I'd like to show you this today.
DSCF8250
Steps 2 -4  - I first start off with the darkest shade, which in this case is Coral and I've gone round the edges where I think the shadows will be. Then I use Sunkissed Pink for the next layer and then Blush.
DSCF8251  DSCF8253
DSCF8254
Steps 5 - 8 - Next I use the Warm Grey 4 where I think the shadows will be, then I've then layered with Coral, then Sunkissed Pink and then Almond.
DSCF8255  DSCF8256
DSCF8257  DSCF8258
Steps 9 - 12 - For the hair I've used the colours Caramel, Walnut, Warm Grey 4 and I've used these where I think the lights and shadows will be. I've then gone all over the hair using Putty to add some highlights.
DSCF8262  DSCF8263
DSCF8264  DSCF8265
Steps 13 - 19 - For the Dress and butterfly wings I've used the following colours in this order Antique Pink where I think the shadows will be, then I've layered then with Salmon Pink and then Baby Pink. Then to add a stronger shadow I've then used Warm Grey 4 where the shadows are and then gone over it again with Antique Pink, then Salmon Pink and then I've gone over the whole areas using Baby Pink
DSCF8266  DSCF8267
DSCF8269  DSCF8270
DSCF8271  DSCF8272
DSCF8273
Steps 20 - 25 - For the shawl, belt and butterfly I've first used Gold where I think the shadows are, then I've gone over it using Tulip Yellow. The next step again I use the Warm Grey 4 where I think the shadows will be, then I've used Gold and Tulip Yellow. For the highlights I've used Putty
DSCF8274  DSCF8275
DSCF8276  DSCF8277
DSCF8279  DSCF8281
For the last two steps I've used Cool Grey 3 to go around the image where I think shadows will be and then used my blender pen to soften the shadows a bit more.
DSCF8283  DSCF8285

And this is the final result.


I hope that this tutorial has given you some ideas on how to colour using ProMarker pens.


Don't forget to come back on Tuesday, to see how this gorgeous image looks on a card.


Hugs Michele x


Friday 16 April 2010

Weekend Workshop #42 - Digi Friday

Welcome to another Digi Friday here at the PfP Weekend Workshop, and we have more treats in store for you, but before I tell you about that, we'll announce the winner from last week's Digi Friday, drumroll please....


Congratulations Maree, please can you email Debbi as soon as possible to arrange your prize from Pollycraft.

So, on with this week's treats, our generous sponsor this week is Digistamp Boutique and all you need to do to win some gorgeous digital stamps is... leave a comment - yes, it's that simple.


And the other treat this week is a fabulous tutorial from Maria, who has focussed on adding pattern to a coloured image, so, over to Maria....


I chose 'Lizzie with Flowers' from the DigiStamp Boutique for next week's Passion for Promarkers challenge, and in my tutorial I'd particularly like to show you how I added a pattern to Lizzie's dress.

Steps 1-3. Colour Lizzie's skin with Ivory, then add shading with Blush, and a spot of Pastel Pink on her cheeks, finally blending the colours together with another layer of Ivory.


Steps 4-6. Colour her hair with Tan, then add shading with Caramel and Walnut, and blend together with Caramel.


Steps 7-8. Colour the flowers with Baby Pink and shade with Carmine, then blend the colours together with Baby Pink. Follow the same steps for colouring the leaves and grass, but using Leaf Green, and Marsh Green for shading.


Steps 9-10. Colour Lizzie's dress with Duck Egg, and add shading with Denim. To add the polka dots, hold your Blender pen vertically and touch the very tip of your nib wherever you would like to place a spot. The Blender will have lifted some of the colour from the dress, and will leave you with a dotty pattern!


I hope you have enjoyed my tutorial this week, and thank you very much, Sally-Ann, for the gorgeous image, which I've enjoyed working with very much.

Maria xx


Friday 9 April 2010

Weekend Workshop #41 Digi Friday

Good Morning, and welcome to another Digi Friday Weekend Workshop, before we let Ida loose with her fabulous tutorial we'll just announce the winner of the Pixie Dust Studio prize. So the lucky lady is.....


Congratulations!! Please email Debbi as soon as possible

We'd also like to thank everyone who commented on Emma's very first tutorial for us at PfP, and hope you continue to come back and see us.

In case you haven't noticed, we're also running a DT Call for 5 new team-members - this is your chance to show off everything you've learned from our tutorials. You'll find all the details on the main blog.

This week's fabulous sponsor is Polly Craft 

pollycraft


So if you fancy a chance to win then all you have to do is leave a comment on this post.

So now we'll hand you over to the very capable Ida...

Welcome to this weeks Digi Friday. Today I (Ida) will show you how I have coloured my image for next weeks challenge. The image is sponsored by POLLY CRAFT. As we get to choose the image I just had to get this cute little kitten "Blossoming Friendship from the Spring Things series.

CLICK ON THE PHOTOS FOR A LARGER VIEW.

  • I start by colouring the cat with the lightest colour I want to use (Warm grey 1). I then add two layers of shades with Warm Grey 2 and 3. To make them blend together I colour over my image again using the lightest of my shades, Warm Grey 1. I use small circle motions to better wet the areas where there are shades.


  • I do the same when colouring the three, flowers and grass. I use the lightest of the shades in the colours I want to use, and then I add a darker colour to make the shades. Before I go over the image with the lightest of my colours
  • On the little cute bird I have just added a orange mouth and used Warm Grey 1 to add some shadows, before I've gone over the image with the Blender pen. I usually don't use the blender pen, but for areas you want to blend to white it works great!
  • Here are the colours I have used to colour my image.

Thanks for looking and good luck colouring.

Ida