Passion for Promarkers Copyright Notice

The design work, text, photographs and videos on this site belong to ©Passion for Promarkers and each individual designer that contributes to this site. This information is shared to inspire you. All content on this site is not to be used for commercial purposes without explicit permission.
Please do not reproduce these articles in any way, mechanical or electronic for anything other than personal use only. But you may hyperlink to any of the articles giving due credit
Thank you!

Important

Weekend Workshops are published every Friday and all are available in PDF format so you can print out and keep them.

All workshops can be downloaded by clicking the small icon at the end of each post.


..........

Friday 30 October 2009

Weekend Workshop #22

TGI Friday! and the added bonus is, its Weekend Workshop day. The entries for this weeks challenge of any colours plus animals have been fabulous so far and there's still plenty of time to enter. Please remember though, that you MUST use promarkers on your creation, and you MUST include the theme and/or colours for that challenge.

So, are you ready for another fab tutorial? This week one of the big bosses at PfP, Denise, has done an image tutorial for you, featuring one of the fabulous  Gorjuss Girls from Sugar Nellie, so... over to you Denise...

Hi, I’m Denise and here is my tutorial for the colour combo Grass and Canary which is our theme next week. Please bear with me as this is my first tutorial EVER!! I apologise if some of the photos are slightly blurry but I’m not an expert when it comes to photography :)


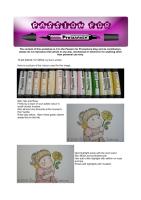
For my tutorial I am using a Sugar Nellie image from the Gorjuss Girls range called ‘flower girl’ and I have used the following promarkers – grass, canary, emerald, tulip yellow, tan, caramel, ivory, blush and pastel pink. Unfortunately in my haste to begin my tutorial I forgot to take a “before” photo ;)


PFP colouring tutorial 1  PFP colouring tutorial 3


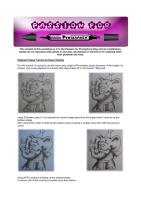
I begin by adding the grass and canary to my image


PFP colouring tutorial 2 PFP colouring tutorial 4


Then I proceed to add shading with emerald and tulip yellow


PFP colouring tutorial 5 PFP colouring tutorial 6


I then blend the colours together using my original colours (grass & canary) then proceed to add tan to the hair


PFP colouring tutorial 7 PFP colouring tutorial 8


The I add caramel for shading to the hair and blend this together by going over again with the tan


PFP colouring tutorial 9 PFP colouring tutorial 10


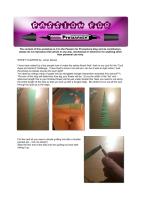
Next I colour all of the skin with ivory and add shading with blush. I add pastel pink to the cheeks and blend together with the ivory once again. The final pic shows that I have added stickles to the flowers and added highlights with a white gel pen.


I hope this tutorial has been of some use to you. You will be able to see my completed card on Tuesday :)


Hugs, Denise x


Well I'm certainly looking forward to seeing Denise's completed card when the new challenge starts on Tuesday.
We hope you find the tutorials helpful and would love to see how you get on. As always, all the workshops are available in PDF format so you can print and keep them, just email me.

Coming up next week: An image tutorial from Ida

Hugs
Gina, Denise and the DT xx


Friday 23 October 2009

Weekend Workshop #21

Hi and welcome to Weekend Workshop #21, and welcome to our new look blog. As you've probably noticed, the workshops are now all on a separate page, so that there's no confusion with the current challenge - we hope you like it.
Gina's still on her wee break, so I'm afraid you're still stuck with me (Debbi)for the time being, but she's like to say thankyou to all of you who have left get well messages for her.

This week we have a stunning tutorial from Helen and you'll see her image being used on her challenge card this Tuesday...

Elephant Image Tutorial by Helen
For this tutorial I'm going to use the warm grey range of promarkers purely because of the image I've chosen,this lovely elephant is a Dustin Pike digi printed off on IQ smooth 160g card .


using WG(warm grey)1 I've coloured the whole image apart from the areas which I want to be the lightest shade .
then using WG2 I start to build up the darker areas covering a smaller area than with the previous colour.

Using WG3 continue building up the shaded areas.
Continue with WG4 covering a smaller area than before.

Using WG5 colour the areas you want the darkest, remembering to make these areas slightly darker as they will lighten when the image is blended.
Using WG1 begin colouring over the image blending the colours as you go. dont be afraid to use the chisel end of the pen to blend the larger areas leaving the white areas free of ink for the time being .

once all the coloured areas are blended then go over the whole image again including the white areas.
The final picture shows the finished image the highlighted areas have been accentuated with an inkessential opaque white pen and the outline coloured with cool grey 1-5.
pop back on Tuesday to see the image on my card
hope this has been of help
hugs
helen x


We hope you find the tutorials helpful and would love to see how you get on. As always all the workshops are available in PDF format so you can print and keep them, just email me.

Coming up next week: A surprise tutorial by one of the bosses, Denise.

Hugs
Gina, Denise and the DT xx

Friday 16 October 2009

Weekend Workshop #20

Hi there, and welcome to our 20th Weekend Workshop - yes its still Debbi here I'm afraid lol
Every week we are more and more overwhelmed with the challenge entries, and we hope that our tutorials, hints and tips are proving useful. The current challenge is a cracker (not literally) and we're looking forward to even more of you entering as you can use any colour of Promarker - please remember though that you do need to use at least 1 Promarker plus the fabulous sketch from Gina to be eligible for the prize. So get crafting, you still have until this Tuesday at 9am to enter.
Gina would also like to thank all of you who have sent her get well wishes - she really appreciates it, you might also want to pop over and enter her super birthday and blogaversary candy. I'll let you into a wee secret, she's gonna be 40 on the 22nd of October. Haha, I'm so going to get my backside kicked for that lol And talking of birthdays, today is Michele's birthday - pop over and send her some birthday wishes.

Anyway, moving swiftly on.... Caryn has done this fantabulous flower tutorial for us all, and its so easy - but so effective.

Spikey flower tutorial by Caryn

I have been asked by a few people how to make the spikey flower that I had on my card for the “Cool Aqua and Apricot” challenge.  I have tried to show it as well as I can but it was at night when I took the photos so please excuse the poor light!! 
You start by cutting a strip of paper into an elongated triangle (remember isosceles from school??).  The size of the strip will determine how big your flower will be.  Go by the width of the “fat” end – what ever length this is your finished flower will be just under double this. Next you need to cut along the entire length of the strip so that you end up with a fringed edge.  Be careful not to cut all the way through but just up to the edge. 
 Picture 1 Picture 2
For the next bit you need a simple quilling tool (like a double-pointed pin – but not sharp!!)
Slide the thin end of the strip into the quilling tool and start rolling it up.
Picture 3 Picture 4
If you are using single-sided paper, then make sure the patterned/coloured side is on the inside of the roll.  Like-wise if you’re using double-sided then the side you want the flower to be should be on the inside of the roll.
Picture 5 Picture 7
At this point you will need to make any little adjustments but DON’T LET GO!!!  Carefully remove it from the quilling tool and add a small dot of glue to the loose end to hold it in place.  Finally, carefully bend the “petals” back from the outside working in.  Lay the flower down on the table and press firmly on the centre to flatten it as much as possible.  Add a dot of glue to the bottom and then it’s ready to go on your card!
Picture 6 Picture 8
Ok, that’s it!  Hope someone out there finds this of use – I’ll be scouring blogland now looking for examples!! 
Take care,
Hugs,
Caryn xxx


I don't know about you, but I can see these flowers popping up on loads of my cards now.
Remember all our tutorials are available in PDF format so you can print them out and keep them. Just email me (Debbi) and let me know which one(s) you would like.
coming up NEXT WEEK – We have an animal image tutorial for you

Hugs Gina, Denise and the DT xxx

Weekend Workshop #19

Firstly we'd like to thank you for all the fabulous entries so far in this week's challenge, there is still plenty of time to enter - before 9am GMT on Tuesday, when the new challenge will start.
This week Sue has done a fabulous tutorial on colouring Tilda, you will love following her simple instructions, and we'd love to see how you get on.
Gina is taking a wee break from things for a while as she still has some ongoing pain from the car accident she was in a few weeks ago, so I (Debbi) volunteered to help Denise with the behind the scenes PfP stuff, so please bare with me


Tilda Colouring Tutorial
Here is a picture of the colours used for this image.


Skin Hair and Rose


Firstly lay a layer of your palest colour in small circular motions.
Skin almond (my favourite at the moment)
Hair Vanilla
Rose tulip yellow.. Stem forest green (darker shade first on this bit)


Next highlight areas with the next colour
Skin Blush and sunkissed pink
Hair add a little highlight with saffron on roots and tips
Roses add highlights with mustard.


Next stage is to blend the colours with the lightest shade
Skin Almond
Hair Vanilla and then a bit more saffron at the root and ends then highlight
with white gel pen.
Rose blend with buttercup, stem use leaf green in the middle and blend over the darker green.

Dress and Sash


Dress as before lay a layer of pale pink all over in a circular motion
Sash colour with satin


Dress highlight and shade with baby pink
Sash use dusky pink in the creases.


Dress blend colours together with pale pink
Sash make sure there is enough shading with dusky pink in creases

Tights Almond and satin alternated then blended together with almond.
Saffron at the edges and white highlighter pen (sorry I can't get a close up in focus)
Colours wings with satin and then I added yellow stickles.

Image before shading and blending


Finished Image ready to make into a card


Hope you made it to the end and thanks for looking Sue :o)


Weekend Workshop #18

Thanks for all of the entries for this weeks challenge, you still have plenty of time to join in the challenge closes at 9am on Tuesday morning.
This week Ida has done a great tutorial on the Forever friends bear, I am sure you will love it.


******************

Forever Friends Tutorial – Ida

Seeing as I love the Forever Friends stamp I wanted to share a very basic tutorial with you on how I coloured my newest bargain! For this tutorial I have used the following colours: Oatmeal, Apricot, Blossom, Rose Pink, Primrose, Soft Lime, Lemon, Yellow and Ice Grey 1. I start of by colouring in the smallest spots on the image in round circle motions. (with the lightest colour tone, in this case Oatmeal) I then move on to colour the larger areas, continuing to use circular motions with my marker. When I have covered my whole image I add a darker colour (Apricot) where I want my shadows to be. When I have added the shadow, I go over the area with my lighter colour (Oatmeal), still in circular motion so that the edge of the darker tone blends with the lighter one. I repeat this step until I've cover all the areas I want to high light with these colours. I also add a line of grey around the whole image to give it some more life. Here I have used Ice Grey 1. I use the same steps to colour the gift box, using one light colour and one darker, in this case - Blossom & Rose Pink for the bow, Primrose & Soft Lime for the box and Lemon & Yellow for the tag. Thanks for looking, I hope this this was some how helpful! :)

******************


coming up NEXT WEEK – We have another great tutorial this time from Sue,
Hugs Gina, Denise and the DT xxx