


Ooops!! I nearly forgot to post this post this morning, as you can see we have no Weekend workshop this week as we are all so busy with the Anniversary Challenge, if you have not joined in yet you have until 9am on Tuesday morning, the theme is "Anything goes" so you have no excuse, any theme, any colours, any creation, the only thing you need to do is use ProMarkers of course
We will be back to normal next week with the digi sponsors and tutorials, so don't forget to pop back then
Have a great Bank holiday weekend,
Hugs Gina, Denise and the Design Team
Friday, 28 May 2010
Thursday, 20 May 2010
Weekend Workshop # 47 Video Tutorial
Well we have a real treat for you this week but before we come to that we have to let you know the winner of last weeks digi images from Doodle Palace , the lucky random winner is........
Part 2 -
Part 3 -
Congratulations! if you could please email Debbi she will sort your prize out.
Right now for the treat, we don't have any sponsors this week but we do have some fabulous video tutorials from Michele, she has never done a video tut before but she is a natural and I know you will all agree the effect she gets using her ProMarkers is stunning.
Part 2 -
Part 3 -
How great were they, we would love to know what you think and I am sure Michele would appreciate any comments. Micheles next tutorial will be shown soon so keep an eye out for it.
Now we have the new DT announcement on Tuesday so don't forget to pop over and it is also our 1st anniversary and to celebrate we have a couple of prizes that you may be interested in and that is all I am going to say, you are going to have to wait until Tuesday :) x
Hugs Gina, Denise and the DT
Friday, 14 May 2010
Weekend workshop #46 – Digi workshop
Well here we are again, another week has passed and I must say you have loved Sue’s tutorial, thank you to everyone who left a comment and now for the lucky winner of last weeks images from "Fred She Said" is………
*** ANDREA ***
Congratulations! if you could please email Debbi for your prize,
************************
This weeks sponsor is Doodle Palace and the lucky winner will be able to pick 5 images of your choice, all you need to do is leave a comment and one winner will be be randomly chosen and you may as well pop over to Doodle Palace to take a peek at some of their gorgeous images too :)

Now onto this weeks tutorial, it is Tracy’s first tutorial and she is very nervous so she wants you to be gentle with her, not that she needs it she has done a fabulous tutorial, so without further ado let's get on
Tracy’s Tutorial
The image I chose to use from Doodle Palace is Dillan the Dragon, and I would like to show you how I get a textured look using just one colour and the blender pen.

As it was a dragon I was colouring I decided to use Pear Green as my main colour.
I printed my image on to Mondi IQ 160g/m2 smooth white cardstock from Staples.
First I coloured all the areas I wanted to be green with Pear Green.
1.

I then went over the whole area with the blender pen using small circular motions, I did this twice, allowing a couple of minutes drying time between coats.
As you can see, the result is a very mottled effect.
2.

Using Pear green again, I touched in the areas I wanted the shadows and darker areas to be, and also put a little green in the areas I wanted almost white with a hint of green.
3.

Finally I went over the whole image again with the blender, blending the areas I just made darker, I repeated this until I was happy with the result.
4.

I hope you find this technique useful.
Hugs Tracy x
Don't forget to pop back and see my finished image on my card for next weeks challenge.

******************
Now a lot of you have been asking about the PDF files, Debbi has been ultra busy over the past couple of months with family and work so they were on hold……but they are back woohoooo, Debbi has worked her little or not so little butt off ;) getting them all updated so if you look at the bottom of each post that is where you will find them.
*****************
If you are on facebook we have a giveaway on our fanpage for a pack of 5 proMarkers, all you need to do is leave a comment on our facebook page, no comments here will be entered. If you do want to join in just go here
That’s it for this week, don’t forget the new challenge starts on Tuesday
Hugs Gina, Denise and DT xxx
Friday, 7 May 2010
Weekend workshop #45 - Digi Friday
Thank you for all of your lovely comments for last weeks tutorial and the storage, I think Tesco will be running out of CD boxes very soon, I know that I have bought mine and love it.

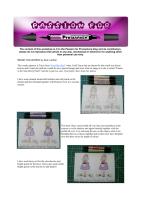
This weeks sponsor is Tracy from "Fred She Said" when I told Tracy that my theme for this week was Strawberries and Cream she said she would do me a special image and wow what an image it is she is called "Emma in the Strawberry Patch" and she is just too cute. I just hope I have done her justice. Click photos for a closer look Skin I have used oatmeal around the hairline and soft peach on the cheeks and then blended together with blush all over in a circular motion. Dress
  This time I have used orchid all over then used amethyst in the creases or in the shadow and again blended together with the orchid all over. I try and keep the pen on the papers when I am blending the two colours together and on this one I have blended over the dress twice for depth of colour. Strawberries
  I have used berry red for the strawberries and bright green for the leave I have also used a little bright green on the berries to add shadow. Petticoat and t-shirt
  This may be a little difficult to see but I wanted the petticoat and t-shirt to be white so I have just used a little ice grey 1 and then blended with the blender pen. Strawberry patch and ground
  I have used berry red for the berries bright green for the leaves and sunflower yellow for the flowers, I have then used meadow green to all over to tone the other colours down and colour the rest of the area. I have used ice grey 1&2 for the area around her feet. Hair
  I wanted Emma to be a red head so I have laid henna and burnt orange down as shown in the first image and then blended together with terracotta. Basket
  The colours for the basket are apricot and terracotta Highlighting
  And here she is all ready to make into a card for Tuesday the image on the right hand side has been high-lighted with a little gelly roll white highlighter pen to give it a little lift. Hope you enjoyed this and good luck in the draw. Thanks for looking Sue :o)
This week we have a fab tutorial from Sue but before we begin lets see who has won a collection of gorgeous images from Lily-Boo's Boutique. Drum roll please, the lucky winner is…………………
Congratulations could you please contact Debbi for your prize :)
******************
This weeks sponsor is "Fred She Said" and the prize is some fabulous images, all you need to do is leave a comment on this post and you will be entered into the draw, which will be randomly chosen.
******************
Sue’s Tutorial - Emma in the Strawberry Patch This weeks sponsor is Tracy from "Fred She Said" when I told Tracy that my theme for this week was Strawberries and Cream she said she would do me a special image and wow what an image it is she is called "Emma in the Strawberry Patch" and she is just too cute. I just hope I have done her justice. Click photos for a closer look Skin
 I have used oatmeal around the hairline and soft peach on the cheeks and then blended together with blush all over in a circular motion. Dress
  This time I have used orchid all over then used amethyst in the creases or in the shadow and again blended together with the orchid all over. I try and keep the pen on the papers when I am blending the two colours together and on this one I have blended over the dress twice for depth of colour. Strawberries
  I have used berry red for the strawberries and bright green for the leave I have also used a little bright green on the berries to add shadow. Petticoat and t-shirt
  This may be a little difficult to see but I wanted the petticoat and t-shirt to be white so I have just used a little ice grey 1 and then blended with the blender pen. Strawberry patch and ground
  I have used berry red for the berries bright green for the leaves and sunflower yellow for the flowers, I have then used meadow green to all over to tone the other colours down and colour the rest of the area. I have used ice grey 1&2 for the area around her feet. Hair
  I wanted Emma to be a red head so I have laid henna and burnt orange down as shown in the first image and then blended together with terracotta. Basket
  The colours for the basket are apricot and terracotta Highlighting
  And here she is all ready to make into a card for Tuesday the image on the right hand side has been high-lighted with a little gelly roll white highlighter pen to give it a little lift. Hope you enjoyed this and good luck in the draw. Thanks for looking Sue :o)
 ******************
I think you will all agree Sue has done a fab job :)
Now we have had quite a few emails asking about the PDF files, don’t worry they have not vanished forever, they just take up quite a bit of time of which Debbi has none at the moment so please bear with us and they will be up and running soon :)
Don’t forget to leave a comment for the chance to win some gorgeous images.
See you all Tuesday for the next challenge and keep an eye out in a few weeks for the new DT announcement and we also have a few more surprises in store too
Have a great weekend
Hugs Gina, Denise and DT xxx
Subscribe to:
Posts (Atom)


