Passion for Promarkers Copyright Notice

The design work, text, photographs and videos on this site belong to ©Passion for Promarkers and each individual designer that contributes to this site. This information is shared to inspire you. All content on this site is not to be used for commercial purposes without explicit permission.
Please do not reproduce these articles in any way, mechanical or electronic for anything other than personal use only. But you may hyperlink to any of the articles giving due credit
Thank you!

Important

Weekend Workshops are published every Friday and all are available in PDF format so you can print out and keep them.

All workshops can be downloaded by clicking the small icon at the end of each post.


..........

Friday 26 February 2010

Weekend Workshop #35 - Digi Friday

Hi there and welcome to our very first Digi Friday, we hope you're going to enjoy what we've organised for you.

Every Friday we are going to feature one digital stamp company in our tutorial and that digital company is offering a prize.

In order to be in with a chance of winning that week's prize all you need to do is leave a comment on that post - that's all there is to it.

We'd love to see you having a go at the techniques we show you in our tutorials, but it's not necessary for you to win the prize.


So to kick off our Digi Friday's we have the fabulous Soft Pencil sponsoring us, and Caryn has done the tutorial featuring one of the digi stamps from Soft Pencil - "Butterfairy"

The prize this week, for 1 lucky, randomly chosen commenter is...


Yup, that's $15 to spend on Elizabeth's gorgeous digital stamps!
So, lets get on with Caryn's tutorial - you're going to love it.

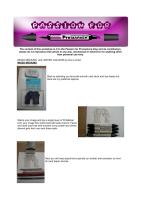
I have chosen this cute little image for the challenge next week from Soft Pencil.  She is printed onto Stampin Up Whisper White cardstock using an inkjet printer.


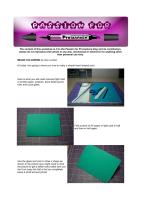
The paper I had in mind inspired me as to how I was going to colour it.  It is from the Sweet Stack by DCWV.


The pattern is very similar to the design on the wings so I chose my colours accordingly

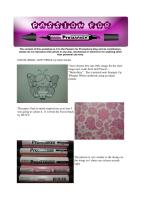
 I started by applying the palest pink all over the wings and then randomly added the other darker shades to different areas until I was happy with the effect I got.


I moved on to the hair chosing shades of yellow building up the colour and adding areas of shadow at the roots with Gold


I coloured in the whole hair area with Primrose to smooth out any hard lines.


For the skin I started with Vanilla and added depth and shadow with Satin.  I gave her rosy cheeks with Blush.


Finally I used a quickie glue pen and highlighted the pattern on the wings and covered her dress finishing off with a dusting of fine crystal glitter.


Hugs,
Caryn xxx


Isn't Butterfairy just gorgeous? and Caryn has done a fabulous job with her - the glitter just finishes it off perfectly.

So, all you need to do now is post a comment - only 1 comment per person please. and we'll choose and announce the winner on next week's Digi Friday

Hugs, Denise, Gina & DT x x

Thursday 18 February 2010

Weekend Workshop #34

This week we have a fabulous monochrome tutorial from Debbi so without further ado its over to Debbi -

It feels like ages since I last did a tutorial, so I thought I'd get back to basics again and show you how I do another monochrome image. You can achieve a really striking effect with just a few grey promarkers.

Firstly here's what I used: Stampin' Up, Whisper White cardstock, Memento Tuxedo Black inkpad, Coffee Time stamp from Sugar Nellie and Ice Grey 1,2,3,4 and 5 promarkers
Stamp your image onto the cardstock
Using the Ice Grey 1, I coloured where the shadowed areas of her skin would be, e.g. under the fringe, under her chin, the bottom side of her hands
Then I used Ice grey 1 again to colour most of her hair, leaving a small section in the middle white
I then took the Ice grey 2, and coloured over most of the area I coloured in the previous step, again leaving a small section near the middle in Ice Grey 1
Repeat this with the Ice Grey 3, then 4 and 5
I then used Ice Grey 1 in small circular motions all over the hair to blend the hard lines, you may have to do this more than once to get rid of the hard lines


For her tights and sleeves, I coloured the whole areas with Ice Grey 2 - using small circular motions
I used Ice Grey 4 to colour lines on either side of alternate stripes on her tights and sleeves
I then used Ice Grey 3 to colour the stripes in between, and then Ice Grey 5 on either side of these darker stripes - this makes the legs and arms look more rounded.
Using the same blending techniques as before, I coloured the dress, coffee cup and shoes


And the finished image...

I hope that has been of some help, and look forward to seeing you all try it out.
Debz
x


I think you will agree it is a fabulous tut, don't forget this weeks challenge runs until Tuesday

Hugs Gina, Denise and Design Team xxx

Friday 12 February 2010

Weekend Workshop #33

Welcome to another Weekend workshop, we are back this week with Sue’s image for her post on Tuesday, she  has done a tutorial on mixed mediums and also Limited colours, over to Sue -
Mixed Mediums Technique
Hi I want to share two different ways to colour you images,my card called for more subtle colours on my images so here are two different ways to achieve the effect. Mixed Medium Technique Start by selecting you favourite smooth card stock and dye based ink. Here are my preferred options. Stamp your image and lay a single layer of ProMarker onto your image this works best with pale colours. Faces are blush boys hair and trousers ivory jumper and shoes almond girls hair ivory and dress satin. Next you will need polychromo pencils (or similar) and sansodor (or similar) and paper stumps. You will now place a small amount of pencil around the face (see the boy) I have used brown.... trust me it does works!!! You then dip your paper stumps into the sansodor and blend the pencil into the centre of the face. Don't be afraid to use plenty of sansodor the ink will not smudge (this is why it must be dye based). Continue to do this using the desired colours on your image, I have used deep pink on the dress and brown on the the trousers hair and shoes and red on the jumper. Add a little glitter to the wing and some Sunkissed pink on the cheeks. You will need to be patient and spend time blending the pencil with the sansodor and you may have to add colour several times until you get to the required depth.
Limited Colours Technique
For this image I have used only Five colours blush,satin,sunkissed pink tan and caramel. Faces coloured with blush trousers tan and dress satin. Colour a layer of satin around the edges of the faces and then a little sunkissed pink on the cheeks blend all over again with blush. A second layer of tan is added around the edges of the trouser and caramel on the shoes and jumper... then blend all the clothes with a layer of satin (I find it is best to do this with the large end). Now do the same with sunkissed and satin on the dress. I have used tan and caramel for the hair. Come back on Tuesday and see this image (with some glitter on the wing) on my challenge week card. Thanks for looking sue :o)
******************
Don’t forget you can download this tutorial by clicking on the image below,


Thanks for joining us this week,
Hugs Gina, Denise and the Design Team

Friday 5 February 2010

Weekend Workshop #32

Gosh, we're into February already - 2010 seems to be flashing before our eyes.
This week we have a super tutorial from Sue, it's a bit of a two-parter as she'll continue with her challenge image next week. So without further ado, over to Sue.

Hi today I am going to show you how to make a simple heart shaped card


Here is what you will need coloured light card or printer paper, scissors, bone folder,pencil, ruler and a pint glass.


Fold a piece of A4 paper or light card in half and then in half again.


Use the glass and ruler to draw a shape as shown in the picture (you might need to click the picture to get a better look) make sure you don't cut away the fold a the top completely leave a small amount joined.


Cut your shape out with scissors and you will have your template for the heart card.


Take half a piece of A4 paper or light card and fold in half.


Take your heart card template and use it to draw a half heart on your paper.


Cut your half heart out a few millimeters inside the line, the new heart will be
smaller.


The smaller heart is the template for your patterned paper.


Fold you desired card in half and use your template to cut your card blank making sure to leave some of the folded edge so you end up with a card and not two hearts!!


Here is your blank card ready to use.
Have fun making your Valentines Day Heart Cards and come back next Friday to see how I colour my image to go onto my card and the finished card on my challenge week which has a theme.

Thanks Sue :o)


What a fab and simple way of making a heart-shaped card, just perfect for all those valentines cards

Coming up next week, image colouring with Sue

Hugs, Denise, Gina & DT x x