Passion for Promarkers Copyright Notice

The design work, text, photographs and videos on this site belong to ©Passion for Promarkers and each individual designer that contributes to this site. This information is shared to inspire you. All content on this site is not to be used for commercial purposes without explicit permission.
Please do not reproduce these articles in any way, mechanical or electronic for anything other than personal use only. But you may hyperlink to any of the articles giving due credit
Thank you!

Important

Weekend Workshops are published every Friday and all are available in PDF format so you can print out and keep them.

All workshops can be downloaded by clicking the small icon at the end of each post.


..........

Tuesday 15 December 2009

And the winner is...................

Thank you to everyone who has entered the prize draw, we can now announce the random.org winner of the Letraset craft kit is

Congratulations Trish, if you could please email me your address at cardkabin@talktalk.net and I will get your craft kit to you asap :)
We would like to take this opportunity to wish everyone a
"Very Merry Christmas
from all of us at
Passion for ProMarkers"
we hope you will all be back in the new year :)
Hugs Gina, Denise and the Design Team

Friday 27 November 2009

Weekend Workshop #26 PLUS Special Xmas Prize

Remember that we said that last week was the last workshop of 2009 – well we told a little white lie! Some of you may already know that Debbi was asked by Letraset to select the colours and put together a tutorial for their new Craft Gift Pack. She was absolutely thrilled to do this for them, and we were very proud of her too. The gift packs are now on sale at various art and craft stores and online, as well as from Letraset direct, so we thought we would share the original tutorial with you. The colours she has used are from the same selection contained in the pack.

******************
Fig. 1 Start by colouring the areas of skin with Blush, lay down more layers to increase the depth in areas that would be in shadow e.g. just under the hat brim


Fig. 2 Colour the clothing, using small circular movements, in Denim Blue


Fig. 3 Concentrating on one area at a time, add a darker shade—China Blue, in areas where there are creases and where there would be shadow


Fig. 4 Blend the hard edges of the darker shade by going over the darker areas, in a circular motion again, with the lighter shade and working outwards


Fig. 5 Shows the same technique applied over the whole image


Fig. 6 Colour the accent/trim areas with Fuchsia, laying down more layers of colour over areas that would be in shadow.


Finish the image by colouring the hair with Caramel, Cocoa and Umber.
Trim the image to the required size, and layer it onto a contrasting cardstock, trimming the edges to leave a narrow border around the image. Add glitter and/or adhesive gems to the image.
Cover a card blank with patterned paper, then take a co-ordinating scrap piece of patterned paper and layer it onto the same contrasting cardstock as before.
Take a piece of white satin ribbon, and using the broad nib, colour the ribbon with Fuchsia. Then wrap the ribbon around the matted paper panel.
Adhere the matted paper panel at an angle to the covered card blank, then, using 3D foam tape adhere the image to the card front.
Add embellishments, the card below has 3 snowflakes punched from the co-ordinating cardstock which have been embellished with snowflake sequins and glitter dots.
Finally add a greeting. (Fig. 7)


Supply List:
Image is Snowflake from Sugar Nellie
Promarkers: Blush, Cocoa, Caramel, Umber, Fuchsia, Denim Blue & China Blue
Papers: Daisy & Dandelion Xmas Pad (also the greeting)
Cardstock: Core'dinations
Papermania Glimmer Dots
Snowflake sequins from Kars 
Anita's white satin ribbon
Martha Stewart snowflake punch
Glamour Dust 


Now I bet you're all thinking that we have forgotten about the prize that was mentioned in the title of this post - no we haven't. To celebrate the launch of the Craft Pack Letraset have been very kind in donating one to give to a lucky commenter.
All you need to do is leave a comment on this post before Tuesday 15th December at 9am (GMT). If you could add a pic and link on your sidebar that would be great too :)

The Craft Gift Pack contains 12 specially selected ProMarkers, 1 ProMarker Blender pen, 1 Fineliner pen, 1 Storage Wallet and 1 Bleedproof Marker Pad.

For another chance to win one of these packs, Debbi is also giving away 1 of these Craft Gift packs, plus lots of other ProMarker goodies up until Monday 30th November on her own blog.
See you again on the 15th December when we'll draw a winner from all the comments left on this post. The prize will be posted as soon as possible after the 15th to hopefully arrive with the winner before xmas.

Hugs, Gina, Denise and the DT xxx

Friday 20 November 2009

Weekend Workshop #25

OOPS - am running way behind today - sorry if you've been waiting patiently for this week's workshop. Where on earth does the time go?

This week's challenge colours of Burnt Umber and Marsh Green is proving to be quite the challenge - but those of you who have been brave enough to give it a try have made some gorgeous creations - so go on, give it a try, you might surprise yourself. You'll get plenty of inspiration from the Design Teams creations. Remember the challenge doesn't end until 9am on Tuesday so you've still got plenty of time.

This is our last tutorial for 2009, Gina and Denise have decided to let the DT have a wee rest until 2010 - when we'll be back all refreshed with some new ideas for you.

So to finish off 2009 in style, we have a fabulous Vintage image tutorial from Maria.


For my vintage colouring tutorial I chose a palette of vintage-look Promarkers that included: Vanilla, Sandstone, Cinnamon, Ruby, Crimson, Khaki, Pear Green, Marsh Green, Powder Blue, Grey Green, and a Blender.

I would normally stamp onto white card, but I thought that using cream cardstock would be more appropriate to start off my vintage theme. I also used Rich Cocoa Memento ink, instead of Tuxedo Black, to continue with the vintage look:

Pic 1
I started my colouring by applying some shading around the inside edge of the snowman with Vanilla:

Pic 2
Then I coloured the brown areas, first with Sandstone, leaving a few areas uncoloured for highlights, followed by Cinnamon for the shadows, blending lightly with Vanilla, and adding more shadow where required:

Pic 3
I coloured in the red areas next, first with Ruby, again leaving some places uncoloured for highlights, then with Crimson for shadow:

Pic 4 and 5
I blended the reds with another layer of Ruby, and removed some of the colour with a blender in the areas where I wanted to show the highlights, and to give a worn look. This is done by gently stroking the blender on the appropriate areas until the amount of colour is reduced to your liking. Go easy if your blender is new and juicy!

Pic 6
To colour his scarf, I used Khaki in the shadows, then a layer of Pear Green all over, and redefined the shadows with Marsh Green, ending with another light covering of Pear Green:

Pics 7 and 8
I coloured the snowman's patches and birdhouse using the colours in my chosen palette. Then I edged the area around the snowman with Powder Blue, to make the image 'pop' a little, although this hardly shows on my photo:

Pic 9 and 10
I cut out my image, and edged it using a piece of Cut and Dry Foam and some Walnut Distress ink, for an added vintage look. Finally, I mounted the finished image onto a brown cardstock mat ready for adding to my card:

Pic 11
I hope that you've enjoyed my tutorial! Please drop by again on Tuesday to see my finished card and all the fabulous ones made by the rest of the Design Team.


Maria xx


And just a wee teaser for you before I go, look out for the biggest challenge yet on PfP coming soon, right after Maria's challenge this Tuesday.

Hugs
Gina, Denise and the DT xx

Friday 13 November 2009

Weekend Workshop #24

Hi there and welcome to our 24th Weekend Workshop - hope this Friday the 13th is lucky for you, personally I'd rather just stay in bed, I'm ridiculously superstitious about things like that.

We're so glad that you're all enjoying Ida's sketch for this week's challenge, and we love seeing all your fabulous creations. Remember, there's still plenty of time to enter before 9am on Tuesday - and you can use any colours of promarkers.

This week we have a very special guest joining us to share how she makes the most gorgeous flowers, please welcome Torill


 Hello everyone!


I’m Torill Fossum Stamnes (http://www.screppa.blogspot.com), and I live in Norway. I love my ProMarkers, but I don’t use them much for colouring my images. I play and draw with them. 
First of all, I want to thank Hanne (http://hanneskreativeverden.blogspot.com/) who has taught me how I could play with the markers.  Take a look at her blog, and see her playing as well.
Now I want to show you how you can make your own flowers with your ProMarkers. It’s not that difficult, but if you are like me (?) the flowers are getting prettier with practice.
I’ll do this step by step, and I hope you will understand my explanations.

Picture 1


For this you need ProMarkers, (I have used canary, saffron, rose pink and maroon for this flower), black pen, white pen, scissor, something round to make the shape, paper for ProMarkers, and a pencil.


Picture 2 (steps 1-6)
1.       1. Draw a circle around the shape with the pencil.
2.       2. Find the centre, and make a yellow circle with the Canary (this is the middle of the flower)
3.       3. Take the Saffron and draw a circle on the Canary
4.       4. Blend this together with Canary
5.       5. Make some dots with Saffron on the canary-circle.
6.       6. Take the Rose Pink and make one petal out of the circle, up to the shape and down again. Fill it up with Rose Pink


Picture 3 (steps 7-10)
1.      7.  Take the darker color and draw some lines at the left on the petal. One-two long lines, and some shorter to . the middle.
2.       8. Blend this with the light color, until the lines are gone. Now you have a darker area, and an area that is lighter.
3.       9. Make another petal, make some darker lines
4.       10. blend
Do  repeat steps 6-8 until you have completed the flower. 


Picture 4 (steps 11-14)
1.       11. Take the black pen, and draw around the yellow center and the dots.
2.       12. Draw around the petal, but stop when you come to the place where the next petal appears.
3.       13. Draw around every petal like this
4.       14. Make some black lines in the center of the flower, and make one line for the pollen on each petal

   
Picture 5 (steps 15-16)
1.       15. Take the white pen, and make white pollen dots and a line on the light side of the petal.
2.       16. Cut out the flower – you are now done.


If you like to make flowers in different sizes, you just draw smaller/bigger circles in step 1.
Have fun!!!
Here are some cards and LO I have made with this technique.


 Thank you so much Torill, for a fabulous tutorial, and I can't wait to see these flowers popping up on blogs.


Coming up next week: Our last tutorial this year, which is an image tutorial from Maria
 
Hugs
Gina, Denise and the DT xx
 

Friday 6 November 2009

Weekend Workshop #23

Hi there, its Friday again so we're back with another Weekend Workshop, this time from the very talented Ida. But before you see that, we'd just like to say thankyou once again for all the fabulous entries to this week's challenge of Grass & Canary. The colours are certainly not in everyone's comfort zone but you've all done a fab job of using those bright cheerful colours, they certainly brighten up the horrible weather we've been having. The challenge ends at 9am on Tuesday, so you've still got plenty of time to enter.

Over to Ida...


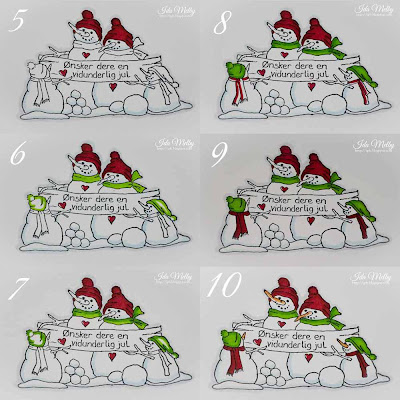
Welcome to this weeks WEEKEND WORKSHOP. I will be showing you how I have coloured my image for my design team card - week 25.

*click on the pictures for a larger view*

Image used: byEVY nr 13.
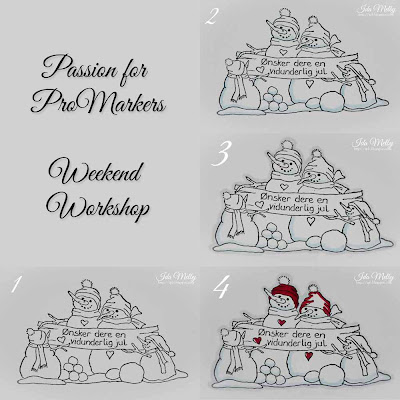
Colours used: Pastel Blue, Ice Grey 1 and 2, Tan, Cocca, Walnut, Crimson,Terracotta, Apricot, Honeycomb, Bright Green and Forrest Green.


Step 1: Stamp the image onto cartridge paper


Step 2: I have added some shadows to the snow family using PASTEL BLUE, using line strokes and not circular motions.


Step 3: I have added a grey shadow around the whole image using ICE GREY 1.


Step 4: I have colured the parents hats with CRIMSON red on the outer edges of their hats.


Step 5: I have gone over the whole area of the hat one more time using CRIMSOM and added shadows with TERRACOTTA.
Step 6: I then add BRIGHT GREEN to the scarf's where I want the shadows to appear.
Step 7: I then add FORREST GREEN as a shadow colour in the outlined areas I coloured with BRIGHT GREEN in the previous photo.
Step 8: I have added the outlined areas of the kids's scaft's using CRIMSON.
Step 9: I blended the scarf with another layer of CRIMSON.
Step 10: And then I TERRACOTTA to make the shadows and add a layer of HONEYCOMB to all the noses on the upper side of the noses.


Step 11: I colour in the outer edges of the sign with WALNUT and add a layer of APRICOT underneat the layer of HONEYCOMB coloured in the last step.
Step 12: WOOOPS this one slipped in between.
Step 13: I then coloured a bit closer to the middle covering the outer edges with COCCA
Step 14: Then I blended both layers of brown with TAN, colouring the whole area.
Step 15: I wanted a bit darker shadow under the image so I coloured a stripe with ICE GREY 2 to give it a bit more depth.
Step 16: I also wanted a bit more shadow on the snowmen so I went over all the inner shadows of them with PASTEL BLUE, aslo adding a shadow I forgot in step 2 (above the sign on the snowmama) And finally I add some white highlights on various places of the image.


And here's my finished result ready glue on to my card:


Thanks for looking and have fun colouring!!

Ida


Well I'm certainly looking forward to seeing Ida's completed card when the new challenge starts on Tuesday.


We hope you find the tutorials helpful and would love to see how you get on. As always, all the workshops are available in PDF format so you can print and keep them, just email me.

Coming up next week: A tutorial from our guest Torrill


Hugs
Gina, Denise and the DT xx

Friday 30 October 2009

Weekend Workshop #22

TGI Friday! and the added bonus is, its Weekend Workshop day. The entries for this weeks challenge of any colours plus animals have been fabulous so far and there's still plenty of time to enter. Please remember though, that you MUST use promarkers on your creation, and you MUST include the theme and/or colours for that challenge.

So, are you ready for another fab tutorial? This week one of the big bosses at PfP, Denise, has done an image tutorial for you, featuring one of the fabulous  Gorjuss Girls from Sugar Nellie, so... over to you Denise...

Hi, I’m Denise and here is my tutorial for the colour combo Grass and Canary which is our theme next week. Please bear with me as this is my first tutorial EVER!! I apologise if some of the photos are slightly blurry but I’m not an expert when it comes to photography :)


For my tutorial I am using a Sugar Nellie image from the Gorjuss Girls range called ‘flower girl’ and I have used the following promarkers – grass, canary, emerald, tulip yellow, tan, caramel, ivory, blush and pastel pink. Unfortunately in my haste to begin my tutorial I forgot to take a “before” photo ;)


PFP colouring tutorial 1  PFP colouring tutorial 3


I begin by adding the grass and canary to my image


PFP colouring tutorial 2 PFP colouring tutorial 4


Then I proceed to add shading with emerald and tulip yellow


PFP colouring tutorial 5 PFP colouring tutorial 6


I then blend the colours together using my original colours (grass & canary) then proceed to add tan to the hair


PFP colouring tutorial 7 PFP colouring tutorial 8


The I add caramel for shading to the hair and blend this together by going over again with the tan


PFP colouring tutorial 9 PFP colouring tutorial 10


Next I colour all of the skin with ivory and add shading with blush. I add pastel pink to the cheeks and blend together with the ivory once again. The final pic shows that I have added stickles to the flowers and added highlights with a white gel pen.


I hope this tutorial has been of some use to you. You will be able to see my completed card on Tuesday :)


Hugs, Denise x


Well I'm certainly looking forward to seeing Denise's completed card when the new challenge starts on Tuesday.
We hope you find the tutorials helpful and would love to see how you get on. As always, all the workshops are available in PDF format so you can print and keep them, just email me.

Coming up next week: An image tutorial from Ida

Hugs
Gina, Denise and the DT xx


Friday 23 October 2009

Weekend Workshop #21

Hi and welcome to Weekend Workshop #21, and welcome to our new look blog. As you've probably noticed, the workshops are now all on a separate page, so that there's no confusion with the current challenge - we hope you like it.
Gina's still on her wee break, so I'm afraid you're still stuck with me (Debbi)for the time being, but she's like to say thankyou to all of you who have left get well messages for her.

This week we have a stunning tutorial from Helen and you'll see her image being used on her challenge card this Tuesday...

Elephant Image Tutorial by Helen
For this tutorial I'm going to use the warm grey range of promarkers purely because of the image I've chosen,this lovely elephant is a Dustin Pike digi printed off on IQ smooth 160g card .


using WG(warm grey)1 I've coloured the whole image apart from the areas which I want to be the lightest shade .
then using WG2 I start to build up the darker areas covering a smaller area than with the previous colour.

Using WG3 continue building up the shaded areas.
Continue with WG4 covering a smaller area than before.

Using WG5 colour the areas you want the darkest, remembering to make these areas slightly darker as they will lighten when the image is blended.
Using WG1 begin colouring over the image blending the colours as you go. dont be afraid to use the chisel end of the pen to blend the larger areas leaving the white areas free of ink for the time being .

once all the coloured areas are blended then go over the whole image again including the white areas.
The final picture shows the finished image the highlighted areas have been accentuated with an inkessential opaque white pen and the outline coloured with cool grey 1-5.
pop back on Tuesday to see the image on my card
hope this has been of help
hugs
helen x


We hope you find the tutorials helpful and would love to see how you get on. As always all the workshops are available in PDF format so you can print and keep them, just email me.

Coming up next week: A surprise tutorial by one of the bosses, Denise.

Hugs
Gina, Denise and the DT xx