


We're so glad that you're all enjoying Ida's sketch for this week's challenge, and we love seeing all your fabulous creations. Remember, there's still plenty of time to enter before 9am on Tuesday - and you can use any colours of promarkers.
This week we have a very special guest joining us to share how she makes the most gorgeous flowers, please welcome Torill
Hello everyone!
I’m Torill Fossum Stamnes (http://www.screppa.blogspot.com), and I live in Norway. I love my ProMarkers, but I don’t use them much for colouring my images. I play and draw with them.
First of all, I want to thank Hanne (http://hanneskreativeverden.blogspot.com/) who has taught me how I could play with the markers. Take a look at her blog, and see her playing as well.
Now I want to show you how you can make your own flowers with your ProMarkers. It’s not that difficult, but if you are like me (?) the flowers are getting prettier with practice.
I’ll do this step by step, and I hope you will understand my explanations.
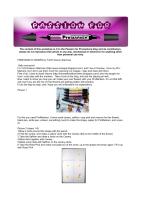
Picture 1

For this you need ProMarkers, (I have used canary, saffron, rose pink and maroon for this flower), black pen, white pen, scissor, something round to make the shape, paper for ProMarkers, and a pencil.
Picture 2 (steps 1-6)
1. 1. Draw a circle around the shape with the pencil.
2. 2. Find the centre, and make a yellow circle with the Canary (this is the middle of the flower)
3. 3. Take the Saffron and draw a circle on the Canary
4. 4. Blend this together with Canary
5. 5. Make some dots with Saffron on the canary-circle.
6. 6. Take the Rose Pink and make one petal out of the circle, up to the shape and down again. Fill it up with Rose Pink

Picture 3 (steps 7-10)
1. 7. Take the darker color and draw some lines at the left on the petal. One-two long lines, and some shorter to . the middle.
2. 8. Blend this with the light color, until the lines are gone. Now you have a darker area, and an area that is lighter.
3. 9. Make another petal, make some darker lines
4. 10. blend
Do repeat steps 6-8 until you have completed the flower.

Picture 4 (steps 11-14)
1. 11. Take the black pen, and draw around the yellow center and the dots.
2. 12. Draw around the petal, but stop when you come to the place where the next petal appears.
3. 13. Draw around every petal like this
4. 14. Make some black lines in the center of the flower, and make one line for the pollen on each petal

Picture 5 (steps 15-16)
1. 15. Take the white pen, and make white pollen dots and a line on the light side of the petal.
2. 16. Cut out the flower – you are now done.

If you like to make flowers in different sizes, you just draw smaller/bigger circles in step 1.
Have fun!!!
Here are some cards and LO I have made with this technique.


Thank you so much Torill, for a fabulous tutorial, and I can't wait to see these flowers popping up on blogs.
Coming up next week: Our last tutorial this year, which is an image tutorial from Maria
Hugs
Gina, Denise and the DT xx


Fantastic tutorial Torill, I will be trying these flowers but I doubt they will come out as perfect as yours :)
ReplyDeleteThanks for doing it for us :)
Hugs Gina xxx
Awesome tutorial and the flowers are just so pretty!!! :)
ReplyDeleteHugs Ida
How clever! Have to try this right now. Thanks!
ReplyDeleteMarie
simply gorjeous
ReplyDeletelove sarah XXX
Who needs stamps when you can draw like this!
ReplyDeleteThanks for showing us the 'how-to'.
Amazing tutorial - I'm given it a go and wasn't holding out much hope for my rubbish colouring skills - but i'm really impressed with the results! Thanks!
ReplyDeletex