


Welcome back to Digi Friday here at the Weekend Workshops of Passion for Promarkers. And can we just say WOW at the response we got over the last week to our very first Digi Friday tutorial. So before we reveal the next Digi Friday Tutorial and Prize Draw, I'm sure you're itching to hear who has won the fabulous $15 gift voucher for Soft Pencil, drum roll please............. it's............
Congratulations, and if you email Debbi, she'll get you sorted out with your prize.
So do you all want another chance to win?
This week, our sponsor at Digi Friday is Bee Crafty and our GDT, Sarah W has put together a double whammy tutorial for you using one of the gorgeous images from there.

The prize is any 3 Bee Crafty images (or a Set or PDF), all you need to do is leave a comment on this post and we'll randomly choose a winner from all the comments next Friday.
So, over to Sarah and her tutorials featuring one of the Bee Crafty images...
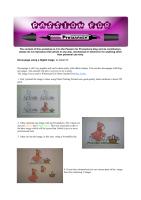
Decoupage using a Digital image
Decoupage is still very popular and can be done easily with rubber stamps. You can also decoupage with Digital images. This tutorial will show you how to do it easily.
The image I have used is Whimsical Girl Heart Garden from Bee Crafty.
1. First I printed the image 4 times using Photo Printing Wizard onto good quality white cardstock ( about 250 gsm)

2. I then coloured one image with my Promarkers. My 2 main colours are Mango and Bright Green. This isn't necessary as this is the base image which will be layered but I think it gives a more professional look.
3. I then cut out the image, in this case using a Nestability die.

4. I have then coloured and cut out various parts of the image from the remaining 3 images.

4. Here is a close up of the cut out images.

5. If you don't have many Promarkers and want to use shading on your images you can go over your colouring with the same colour to deepen it. In this case I have gone over the Mango with the same Mango pen on the left side of the image. I have done the same with the Bright Green. This will give the shaded effect

6. I have layered the pieces on top of each other with foam pads.

7. Next I have used Glossy accents over the heart shape flowers and sprinkled tiny yellow accent beads. The Glossy accents is clear and will act as a glue to hold the beads in place.


And there you have a decoupaged image made from a digital image.
Digital image on Shrink plastic and coloured with Promarkers.
1. I have also printed the image directly on to Shrink plastic. Be careful when handling this though as the ink stays wet.

2. Colour in the image taking care not to touch the print as it will smudge. Your colouring with Promarkers doesn't have to be good here! Don't use very dark colours as the colours you use intensify when the image is shrunk. Punch a hole in the Shrink plastic if you wish to attach it to your project with a brad or to thread ribbon through.

3. Finally shrink it with a Heat gun. You now have a small "tile" to attach to your project

Sarah


Georgeus!! I wish I was as good as this!! Practice, practice... :-)
ReplyDeleteBoth tutorials are great! I really want to try the shrinking one :)
ReplyDeleteGreat tutorials. I'm going to try the shrink plastic.
ReplyDeleteMarion
great job on the tutorials Sarah :-)... Accent beads?!..youve opened a whole new world lol..now if only i can find somewhere that stocks them...Debs x
ReplyDeleteThanks. An interesting tutorial, and the advice on the printable shrink film will prove very valuable!
ReplyDeleteCongrats Jenni on winning :-)
ReplyDeleteWow excellent tutorial Sarah...Bee Crafty images are SO cute...!
Thank you for a great tutorial, I will for sure try this out, but I guess I will need lots of practice to get the grip of it :)
ReplyDeleteahh. this is super cool.. and congrats to Jenni for winning.. : woohoo.. I am crossing fingers and toes.. HUGS
ReplyDeletethis was a fab tutorial i love shrink plastic but i have not tried the printable one yet so i must give that a try.
ReplyDeleteWell done jenni for winning last weeks draw.
hugs
Lorraine xx
Excellent tutorial...great pictures!
ReplyDeleteohh not tried shrink plastic. will now have to give it a go! Great tutorial again!
ReplyDeleteManda xx
What a really great tutorial, thanks for sharing.
ReplyDeleteThanks for another brilliant tutorial. Can't wait for Fridays as I just luv everything you bring to us. Lotsa luv Carol xxx
ReplyDeleteSuch cute carachters. Nice tut. as well. Have a good day!
ReplyDeleteMarie
The tutorials are great, really helps in trying out new techniques. Roll on Fridays. Hugs Suzi x
ReplyDeleteSarah, what a a great job with the tutorials. I have done decoupaging with digital image but never tried shrink plastic as my printer doesn't like vellum or acetate very much but I do like the effect. I have taken part in a number of Passion for Promarkers challenges but never seen anything about tutorials - yes, I know, I must have been walking around with bag over my head!!!
ReplyDeleteI'd love to be in with a chance of winning some digital images as I'd put them to good use in my cards that I make to sell to raise funds for different charities.
I'll be back. Best wishes, Kym xxx
Great tutorials - love the shrink plastic tiles - sure I've got some somewhere, must dig it out...!
ReplyDeleteFab tutorials and love the beads and glossy accents thanks for sharing Julye
ReplyDeleteAnother great tutorial, thx xxx Carol
ReplyDeleteFabulous tutorial, I really must have a go with shrink plastic.
ReplyDeleteHugs
Anj
xx
What inspiration! Thank you, off to raid the kids shrink plastic stash!!
ReplyDeleteReally great tutorials and these stamps are so cute! Thank you for inspiration!
ReplyDeleteI've just came across this fantastic blog by accident and i'm so glad i did! I've only recently purchased Promarkers and now i'm hooked they are brilliant and i now use pretty much only them to colour my digi and stamped images. I love the idea of the tutorials and i'm now going to pour over them and see all the tips and hints i can pick up. Many thanks for sharing this brilliant blog!
ReplyDeletehugs
Michelle
xx
Great workshops! I love seeing Bee Crafty images layered, they work really well with this technique as the shapes and lines of the images are clean and open.
ReplyDeleteSuper job Sarah :)