


So, before we get on to this week's tutorial and sponsor, you'll be wanting to know who won the fab prize from Bee Crafty.... well the randomly chosen winner is ....
congratulations, please email Debbi so she can sort out your prize for you.
This week we have another fabulous prize from our sponsor Fred She Said, and it's Debbi's turn to use one of their images for her tutorial.

You could win $15 to spend in the Fred She Said online store and all you need to do is leave a comment on this post. We'd also appreciate it if you helped to spread the word, but it's not compulsory.
Now, over to Debbi for her image tutorial...
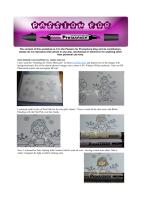
I have used the "Smelling the Cherry Blossoms" set from Fred She Said, and printed one of the images with background and a few of the cherry blossom images onto a sheet of SU Whisper White cardstock. I have an HP Photosmart printer and use regular HP ink)


I coloured small circles of Pale Pink for the wee girl's cheeks,

Then covered all the skin areas with Blush, blending with the Pale Pink over her cheeks

Next, I coloured her hair, starting with Caramel which I used all over - leaving a small area white. This is where I imagine the light would be shining onto.

Then I used Cocoa to cover the whole area - apart from the white area and a small area of the Caramel

The next shade I used was Walnut, which I used on the darkest areas of her hair ie: at the roots and ends.

I went back over all the coloured areas of the hair to blend with Caramel

To colour her kimono, I coloured it using small circular motions over the whole area with Meadow Green, then used small marks of Apple where I imagine the shadowed areas would be. I used the Meadow Green again to blend the darker areas.


I then coloured the kimono trim and her obi (that's the sash of a kimono) with Arctic Blue, laying down more layers for the shaded areas

Moving onto the cherry blossoms, I first dotted some Aubergine into the centres, then blended outwards onto the petals with Pink Carnation

To colour the wall I used Warm Grey 3 and 4, and added some Tan to the stones to give them a bit more texture

And to finish off the background, I used Lilac and Amethyst to colour the mountains, Leaf Green, Apple and Meadow Green for the grass, Leaf Green, Umber and Caramel for the trees and Cool Grey 3 to add a bit of shadow to her tabi socks.

I'll be using this image on my DT card this Tuesday, so look out for it.
Debbi
x


wow she is colloured perfectly! Thanks for the tutorial, it's fab!
ReplyDeleteWow what a gorgeous image Debbi, and coloured so beautifully. Can't wait to see your completed card on Tuesday.
ReplyDeleteHugs Tracy x
Lovely image and the colouring is excellent. xxx Carol
ReplyDeleteGreat tutorial, love the image, you have made her so peaceful looking in you pastel colours. Hugs Suzi x
ReplyDeleteAnother great tutorial Debbi. I love how you've coloured the image and can't wait to see the finished card next Tuesday.
ReplyDeleteDebz
Hi Debbi
ReplyDeleteThanks for the great tutorial! That image looks really cute and love the colours you have used ;-)
Sarah x
Fab tutourial Debbi! The colours are amazing. Can't wait to see your card! Great job!
ReplyDeletexMarie
Gorgeous image and coloured so beautifully! Thanks for the tutorial. x
ReplyDeleteOh this is lovely and I have those exact colours in my range, so will be trying this one out tomorrow. Thank you for the tutoral.
ReplyDeleteGorgeous, absolutely gorgeous, thanks so much for the tutorial.
ReplyDeleteGreat tutorial, I've never used Pro Markers they look wonderful. I have used FSS digi stamps and pre colored digi stamps they're awesome!
ReplyDeleteWow your colouring is amazing, thank you so much for the tutorial, I have so much to learn with the PMs x Beautiful image too!
ReplyDeleteThanks for tbe fab tutorial. I love the image and the colours you have used. x
ReplyDeletegreat tutorial, off to get out my new promarkers and have a go, love that image too
ReplyDeletemany thanks
sue
What a wonderful tutorial, thank you Debbie. I love all of traceys images. I wish I had some Promarkers, perhaps one day I will save up for some.
ReplyDeleteCyprus Anne
Thanks so much for the coloring tutorial. I will be looking for your card. Jean
ReplyDeleteWOUW thank you soooo much for the tutorial.Í´ve just never been good at coloring with markers, so I´m definately going to try and follow this step by step to practise, cause if I can just make it look something like this, I´ll be more than happy ha ha ha. I sooo wish, I could color a lot better as I just loves these images sooo much.
ReplyDeleteBiiiiig hugs Maryann
what a beautiful image. her kimono is beautiful, fab colours for her. Great tutorial!
ReplyDeleteSammy xxx
Love the tutorial. Hair is so hard to do, I am thrilled you added it, now to practice, LOL
ReplyDeleteI need more practice blending colors and your tutorial was a big help - knowing to go back over everything with the lighter color to blend,e.g. the hair. Thanks!
ReplyDeleteI love the tutorial also. I have a hard time with shading and coloring. But I really like the look of the technique.
ReplyDeleteThanks to Tracey over @ Fred's I now have the best place to learn about promarkers. Thank you so much for showing me how to colour & blend. I think it may be good idea to buy what I need & not in packs as some online shops only seem to have.
ReplyDeleteHugs Eileen x
Great tutorial,I haven't heard of these markers before ,Iam really impressed with what you have done.also love the image.
ReplyDeleteJocelan P
Great tutorial, thank you very much.
ReplyDeleteSusan
I might get my hair better now I know the trick thank you for a fab tutorial Julye
ReplyDeletewow this is absolutely gorgeous...gonna have to go buy this one ad follow your distructions to see if I can get the shading any better
ReplyDeletethanks for the fab tutorial hun
hugs shell xx
What a nice tutorial and beautiful coloring! I'm going ot have to check those markers out. Thank you for sharing. :-)
ReplyDeleteKaren
Love your coloring and your tutorial is awesome...very nice to see the step by step pictures. Love the image you used as well. Thanks!
ReplyDeleteThank you for another great lesson - "promarkerlism" (new word for the dictionary - the addiction to ProMarkers) is a constant learning experience AND another excuse to pop a new colour in the collection!! Great digi's too!! Thankyou X
ReplyDeletethank you for a fantastic tutorial on ProMarkers and shading, I have a hard time shading and by following this tutorial it should be a lot easier, Love the image you have used too and look forward to seeing your card.
ReplyDeleteThank you.
Beautiful coloring and a great image. Thanks for the tutorial.
ReplyDeletethis is a fantastic tutorial so briliantly explained and coulared
ReplyDeleteMargaret
That's a great tutorial and a wonderful picture.
ReplyDeleteVery good tutorial, love it, and the cards is great too!
ReplyDeleteAdorable image and great coloring. Thanks for the tutorial...
ReplyDeletelovely tutorial, thanks! now i need to get myself some more images, and some more colours!
ReplyDeletewow, awesome tutorial and coloring job. Thanks so much for the step by step instruction.
ReplyDeleteThe step by step makes it sound sooo easy - thank you for explaining where to shade - and more importantly why!
ReplyDeleteYou have inspired me to have a go.....
Thank you
x
Fabulous tutorial and I love how you have coloured the image.
ReplyDeleteCathy xx
Hi - I'm pretty new to Promarkers so love any tips and tricks I can pick up along the way. This is a great tutorial and a fab finished result. Best wishes Karen x
ReplyDeleteWow!
ReplyDeleteFantastic colours and clear tutorial - I am very new to promarkers and stamping and my shading needs some help! Your tutorials give me some clue as to what I'm doing.
Thank you
Debbie
Thanks for the tutorial. Excellent step-by-step instructions.
ReplyDeleteHugs.
Norma
Wow, you make it look so easy. Thank you very much. Debs xx
ReplyDeleteAnother fantastic tutorial. I love this image and the colours used are fabulous.
ReplyDeleteMarion
Fab tutorial, need to get my mojo back, think it went south for the winter.lol..this just may do the trick and the sun has been out for a couple of days so you never know...have the image so even better, love your step by step instuctions makes it look so easy..hugs Jackie xx
ReplyDeleteWOW! I'm very new to promarkers and I find these tutorials excellent thank you so much for these I learn so much
ReplyDeleteMaree
I keep folowing your tutorials, your colouring is so fab. I can see an improvement in my work but struggle with the hair sometimes especially grey and black. This card looks great on your blog. Marianne x
ReplyDeleteLove the tutorial as I have trouble getting my Promarkers to look right when I colour in.
ReplyDeleteElaine
What a cute image! Your coloring is fantastic and I love seeing how other people color their images.
ReplyDeleteI just adore this image and thanks for the tutorial!
ReplyDeleteFabolous tutorial! I really needed that!
ReplyDeleteLove the coloring of this image. It's gorgeous! Thans for the tutorial!
ReplyDeleteBlessings, Pat B
Thanks for the tutorial. I am so bad at shading. I need to continuously read these type of things and essentially copy them in order to make my images look decent.
ReplyDeleteFantastic image, love the colours & great tutorial :) Thank you x
ReplyDeleteI have never heard of pro markers and now I am doing google searches for them! This is an amazing card and the colors are great! Thanks for sharing your time and talent!!!
ReplyDeletefantastic tutorial has helped me loads i onl got my promarkers yesterday so im jsut starting out
ReplyDeletelove Dana xx