


This week's challenge colours of Burnt Umber and Marsh Green is proving to be quite the challenge - but those of you who have been brave enough to give it a try have made some gorgeous creations - so go on, give it a try, you might surprise yourself. You'll get plenty of inspiration from the Design Teams creations. Remember the challenge doesn't end until 9am on Tuesday so you've still got plenty of time.
This is our last tutorial for 2009, Gina and Denise have decided to let the DT have a wee rest until 2010 - when we'll be back all refreshed with some new ideas for you.
So to finish off 2009 in style, we have a fabulous Vintage image tutorial from Maria.
For my vintage colouring tutorial I chose a palette of vintage-look Promarkers that included: Vanilla, Sandstone, Cinnamon, Ruby, Crimson, Khaki, Pear Green, Marsh Green, Powder Blue, Grey Green, and a Blender.
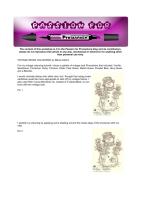
I would normally stamp onto white card, but I thought that using cream cardstock would be more appropriate to start off my vintage theme. I also used Rich Cocoa Memento ink, instead of Tuxedo Black, to continue with the vintage look:
Pic 1

I started my colouring by applying some shading around the inside edge of the snowman with Vanilla:
Pic 2

Then I coloured the brown areas, first with Sandstone, leaving a few areas uncoloured for highlights, followed by Cinnamon for the shadows, blending lightly with Vanilla, and adding more shadow where required:
Pic 3

I coloured in the red areas next, first with Ruby, again leaving some places uncoloured for highlights, then with Crimson for shadow:
Pic 4 and 5

I blended the reds with another layer of Ruby, and removed some of the colour with a blender in the areas where I wanted to show the highlights, and to give a worn look. This is done by gently stroking the blender on the appropriate areas until the amount of colour is reduced to your liking. Go easy if your blender is new and juicy!
Pic 6

To colour his scarf, I used Khaki in the shadows, then a layer of Pear Green all over, and redefined the shadows with Marsh Green, ending with another light covering of Pear Green:
Pics 7 and 8

I coloured the snowman's patches and birdhouse using the colours in my chosen palette. Then I edged the area around the snowman with Powder Blue, to make the image 'pop' a little, although this hardly shows on my photo:
Pic 9 and 10

I cut out my image, and edged it using a piece of Cut and Dry Foam and some Walnut Distress ink, for an added vintage look. Finally, I mounted the finished image onto a brown cardstock mat ready for adding to my card:
Pic 11

I hope that you've enjoyed my tutorial! Please drop by again on Tuesday to see my finished card and all the fabulous ones made by the rest of the Design Team.
Maria xx
And just a wee teaser for you before I go, look out for the biggest challenge yet on PfP coming soon, right after Maria's challenge this Tuesday.
Hugs
Gina, Denise and the DT xx


What a gorgeous snowman!! These are some of my favourite colours too, thanks for taking the time to make all of the fab tutorials, I have picked up so much from them all!!
ReplyDeletehugs Angela x
Yet another stunning workshop :) I've learned so much over the last few months & I can't wait for more, please hurry back from your break!!
ReplyDeleteThis is just stunning, beautiful colouring, wouldn't have know where to start. Thanks so much.
ReplyDeletePinky