


Sorry the post is late today, I got a bit carried away with it being Good Friday and had a lie in. Before we begin thank you for all the comments for last weeks tutorial. The winner of $10 worth of images from Digital Delights is
If you can email Gina please Michelle
This weeks sponsor is Pixie Dust Studio, just leave a comment for a chance to win some gorgeous images

Right now over to Emma for a great tutorial, enjoy!
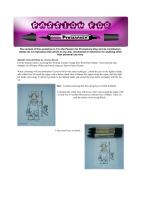
For my tutorial today I am using the ''Fishing Friends'' image from Pixie Dust Studio. I have printed onto Stampin Up Whisper White card stock using my Epson Stylus Printer.
When colouring with my promarkers I tend to follow the same technique...colour the area in the lightest shade, add a thick line all round the edges with a darker shade then a thinner line again round the edges with the darkest shade I am using. To blend I go back to the lightest shade and colour the area until I am happy with the finish.
Skin - I started colouring the skin using Ivory,Vanilla & Blush.
I coloured the whole area with Ivory, then went around the edges with a thick line of vanilla followed by a thinner line of Blush. I also created the cheek colour using Blush...

I then used Ivory to blend...

Hair - For the hair I used Satin, Tan & Cinnamon.
Following the same technique - Satin all over, thick line of tan and then a thinner line of Cinnamon...

Then blended using Satin...
 Boots - I coloured the boots using Cool Grey 1 & 3 plus Ice Grey 5...
  Dungarees - Pastel Blue, Cool Aqua, Duck Egg and Agean for the buttons...
  Shirt - Lime Green, Pear Green & Moss
  Patch & Bucket - Lipstick Red & Ruby...
  Then to add the finishing touches to my image I coloured all round the outer edge with Cool Grey 1, added highlights using a Uni-Ball Signo white pen and used a Sakura Gelly Roll 'Clear Star' pen to add a bit of shimmer to the fishing line and bucket.
  I hope you have enjoyed my tutorial and remember to check back on Tuesday when I will be using this image on my challenge card.
Hugs Emma x
Hope you all have a great Easter
Hugs Gina, Denise and the DT xxx


great tutorial and such a cute image-off to have a browse now! xx mary G
ReplyDeleteAnother brilliant tutorial, thank you so much.
ReplyDeleteGorgeous image too, got to love Pixie Dust Studio's images :)
Suzi
xxx
great tutorial!! thanks
ReplyDeleteGreat tutorial on a lovely image. xxx Carol
ReplyDeleteGreat tut.! A very cute image. Looking forward to see your card in the coming days.
ReplyDeletexMarie
great image and fab tutorial thanks xx
ReplyDeleteThanks for the tutorial... must get me the Tan and Satin for the hair, as it looks great like that, just have the cinnamon from those.
ReplyDeleteThanks xxx
well i really like that i am uming and arring as whether to buy some promarkers and now the answer is yes
ReplyDeletelovely immage
Thanks for the tutorial, another one to add to my list :-) Thank you
ReplyDeleteThank you for another fab tutorial. Love the image too.
ReplyDeleteLove, Andrea xx
Thank you for the tutorial! I haven't been to this site before but I will definitely be back now for the tutorials.
ReplyDeleteWonderful tutorial. I love that image and the choice of colours is fab.
ReplyDeleteMarion
Super Tutorial - i love how you explain all detalis.
ReplyDeleteStinne
Fab tutorial and Happy Easter!
ReplyDeleteWonderfully illustrated, will definitely be trying some of these out. Thank you. Suzi x
ReplyDeleteGorgeous colouring and great tutorial. Thank you.
ReplyDeleteCathy xx
Lovely tutorial, thank you :)
ReplyDeleteGreat tutorial again! THANKS!
ReplyDeleteI have just brought my first two packs of pro markers and this tutorial was just what I needed to get started. Thanks Emma!
ReplyDeleteGreat tutorial,I love this image and you have coloured it so well. The finished card is beautiful as I have already seen it with the other DT sample cards.
ReplyDeleteLynn x
Wow how cool is that. Am still in the learning process so found this VERY helpful. Have saved this page as a bookmark off to explore for some more tips. Thanks for such an easy to follow tutorial.
ReplyDeleteJenny T.
Great tutorial Emma and a lovely boy image. :o)
ReplyDeleteEmma, wonderful step-by-step tutorial. And the pictures are great. TSF.
ReplyDeleteHug.s
Norma
Hi, AND Thank You so much for this step by step tutorial! Only got my Promarkers on Tuesday and was struggling a bit until I followe your easy steps in this tutorial, and Now I have actually managed my first usanble image! Thanks for this great blog will certainly check back again for more handy tips and inspirations! Thanks again and keep up the good work!
ReplyDeleteHugs Kobie!
fantastic tutorial thankyou so much for this
ReplyDeletei started my first image with promarkers last night an this tut helped Me so much
you guys are awesome
love Dana xx
Great tutorial!!
ReplyDelete