


Congratulations!! Please email Debbi as soon as possible
We'd also like to thank everyone who commented on Emma's very first tutorial for us at PfP, and hope you continue to come back and see us.
In case you haven't noticed, we're also running a DT Call for 5 new team-members - this is your chance to show off everything you've learned from our tutorials. You'll find all the details on the main blog.
This week's fabulous sponsor is Polly Craft

So if you fancy a chance to win then all you have to do is leave a comment on this post.
So now we'll hand you over to the very capable Ida...
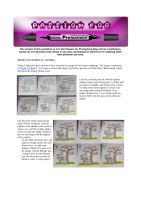
Welcome to this weeks Digi Friday. Today I (Ida) will show you how I have coloured my image for next weeks challenge. The image is sponsored by POLLY CRAFT. As we get to choose the image I just had to get this cute little kitten "Blossoming Friendship from the Spring Things series.
CLICK ON THE PHOTOS FOR A LARGER VIEW.
- I start by colouring the cat with the lightest colour I want to use (Warm grey 1). I then add two layers of shades with Warm Grey 2 and 3. To make them blend together I colour over my image again using the lightest of my shades, Warm Grey 1. I use small circle motions to better wet the areas where there are shades.

- I do the same when colouring the three, flowers and grass. I use the lightest of the shades in the colours I want to use, and then I add a darker colour to make the shades. Before I go over the image with the lightest of my colours
- On the little cute bird I have just added a orange mouth and used Warm Grey 1 to add some shadows, before I've gone over the image with the Blender pen. I usually don't use the blender pen, but for areas you want to blend to white it works great!

- Here are the colours I have used to colour my image.

Thanks for looking and good luck colouring.
Ida


Wow your colouring is amazing, so warm and beautiful, thank you for sharing! Love the image too x
ReplyDeleteFab tutorial!! This is making it really easy for a newbie like me to enjoy ProMarkers even more!!
ReplyDeleteBig thank you to everyone that contributes to the tutorials.
Congrats Norma!
ReplyDeleteFab tutorial, that image is soooo cute!!!!
Thanks for the tutorial...this image is just darling!!!
ReplyDeleteSo many colours! Love it...thank you for another great tutorial
ReplyDeleteX
Fab tutorial and great colouring. I always struggle with animals .. so going to have a go at thsi.
ReplyDeleteHugs
Cathy xx
Beautiful colouring of a very cute image :-))
ReplyDeleteSweet! Looking forward to see the whole card. Only a few days to go! Great work!
ReplyDeletexMarie
Lovely colouring and a very cute image! x
ReplyDeleteCute! I am looking forward to seeing the finished card.
ReplyDeleteA beautiful image - fantastic colouring! Thank you for your tutorial. Look forward to the finished card.
ReplyDeleteLove, Andrea xx
I love that image but seem to struggle with animals. such an easy to follow tutorial - thank you x
ReplyDeleteI've got this image so you've inspired me to give it another airing! xxx Carol
ReplyDeleteGreat colouring and tutorial! Cute image too!
ReplyDeletelove this tut the cat is so cute..my moms birthday is comign up an it will be perfect..thanks!
ReplyDeleteWhat a gorgeous image and your colouring is amazing.
ReplyDeleteMaree
x
what a great tut.... i will have to get the grey pack...dont have many of them.... i think your tut was great.. and the image you picked is soo cute...!!!
ReplyDeletekaz_za
this was a great tutorial thankyou for sharing and what a great prize for this weeks commenter good luck everyone xx
ReplyDeleteLovely tutorial :)
ReplyDeleteCongrats to Norma :)
Kjempeflott tutorial, moro å se forskjellen fra bilde til bilde! Ha en fortsatt flott dag! :)
ReplyDeleteGorgeous...I love that cat!
ReplyDeleteLove the tutorial, you make it look so achievable. Thank you. Suzi x
ReplyDeleteFabulous cat. You did a great tutorial. Thanks
ReplyDeleteMarion
Fab tutorial. Thanks for sharing. x
ReplyDelete