


This week we have a fab tutorial from Sue but before we begin lets see who has won a collection of gorgeous images from Lily-Boo's Boutique. Drum roll please, the lucky winner is…………………
Congratulations could you please contact Debbi for your prize :)
******************
This weeks sponsor is "Fred She Said" and the prize is some fabulous images, all you need to do is leave a comment on this post and you will be entered into the draw, which will be randomly chosen.

******************
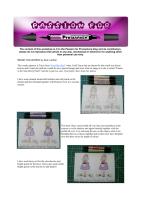
Sue’s Tutorial - Emma in the Strawberry Patch This weeks sponsor is Tracy from "Fred She Said" when I told Tracy that my theme for this week was Strawberries and Cream she said she would do me a special image and wow what an image it is she is called "Emma in the Strawberry Patch" and she is just too cute. I just hope I have done her justice. Click photos for a closer look Skin
 I have used oatmeal around the hairline and soft peach on the cheeks and then blended together with blush all over in a circular motion. Dress
  This time I have used orchid all over then used amethyst in the creases or in the shadow and again blended together with the orchid all over. I try and keep the pen on the papers when I am blending the two colours together and on this one I have blended over the dress twice for depth of colour. Strawberries
  I have used berry red for the strawberries and bright green for the leave I have also used a little bright green on the berries to add shadow. Petticoat and t-shirt
  This may be a little difficult to see but I wanted the petticoat and t-shirt to be white so I have just used a little ice grey 1 and then blended with the blender pen. Strawberry patch and ground
  I have used berry red for the berries bright green for the leaves and sunflower yellow for the flowers, I have then used meadow green to all over to tone the other colours down and colour the rest of the area. I have used ice grey 1&2 for the area around her feet. Hair
  I wanted Emma to be a red head so I have laid henna and burnt orange down as shown in the first image and then blended together with terracotta. Basket
  The colours for the basket are apricot and terracotta Highlighting
  And here she is all ready to make into a card for Tuesday the image on the right hand side has been high-lighted with a little gelly roll white highlighter pen to give it a little lift. Hope you enjoyed this and good luck in the draw. Thanks for looking Sue :o)
 ******************
I think you will all agree Sue has done a fab job :)
Now we have had quite a few emails asking about the PDF files, don’t worry they have not vanished forever, they just take up quite a bit of time of which Debbi has none at the moment so please bear with us and they will be up and running soon :)
Don’t forget to leave a comment for the chance to win some gorgeous images.
See you all Tuesday for the next challenge and keep an eye out in a few weeks for the new DT announcement and we also have a few more surprises in store too
Have a great weekend
Hugs Gina, Denise and DT xxx


Morning Everyone,
ReplyDeleteThanks for this fab tutorial as I am still new to Promarker I find these extremely handy and will defnitely pop back again!
Hugs Kobie
Wowza! She is gorgeous! Thank you for a fab tutorial.. I always check on a Friday to get the mojo for the weekend goin' lol Thank You! :o)
ReplyDeleteстрахотна е ,толкова сладка....
ReplyDeleteWoW Sue! Really great tut! I love the hair and skin. Have to try these colours myself!
ReplyDeletexMarie
She is adorable! Thanks for the tutorial and a chance to win!
ReplyDeleteSue! Great tutorial, beautiful colours used & another new introduction to a great site - thank you!!
ReplyDeleteThanks for the tutorial, it was great! The colouring are really cute.
ReplyDeleteFab tutorial. Thanks
ReplyDeleteClare
Awww thanks so much for the tutorial, I really love reading them, they're a great help... Hugs xxx
ReplyDeleteAnother fabulous tutorial! Thank you!
ReplyDeleteWOW! Just beautiful. Thanks again
ReplyDeleteMaree
x
lovely image nd colouring. thanks.
ReplyDeleteFabulous tutorial and how lucky were you to have the digi done for you. It is a beautiful image.
ReplyDeleteMarion
Lovely image and a great tutorial. I am very new to promarkers so find these tutorials extremely helpful, thank you.
ReplyDeleteHugs Christine x
Thank you for another fab tutorial. x
ReplyDeleteHi,
ReplyDeleteLast Friday i received my first set of promarkers, i love them, i also think this blog is great!! I am learning soo much here.
Bye, Jolanda
this came out fabulous an i love the gelly pen tip
ReplyDeletethankyou!
Another great tutorial, I look forward to checking them out on Fridays.
ReplyDeleteLynn x
Great workshop as usual! Love the dress colour. Sian x
ReplyDeleteI just love this "Emma in the Strawberry Patch" image and the tutorial was very informative.
ReplyDeleteLovely combination of colours - especially for the hair. Thanks for sharing your ideas!
ReplyDeleteAbsolutely stunning. I love the image from FredSheSaid and I also love the tutorial on the ProMarkers. Thank you so much.
ReplyDeleteFab tutorial, thanks for the tip with the white gel pen. Debs xx
ReplyDeleteThanks so much for a great tutorial. I love the finished result!
ReplyDeletePam (nedlnut)
Great tutorial - I love all your tips as I am a crafter not an artist, love the colour combo thanks
ReplyDeleteWow - what a huge help this is going to be! And I LOVE the new set.
ReplyDeleteDianeL
loyaz1@wbhsi.net
Brilliant tute, well done Sue.
ReplyDeletehugs
Michelle
x
This is just what I needed! I'm new to Promarkers, and need all the help I can get. Thank you!
ReplyDeleteThanks for the tut! It's a great help for a newbie to ProMarkers.
ReplyDeleteChris
Thanks for a brilliant tutorial, will definetly be very useful to me. Cat.x.
ReplyDeleteOur Local shop just has added these makers to their stock. Love the face colouring you did...like it all!!!!
ReplyDeleteGreetings from the Netherlands
Carla
WOW great job on the tutorial. I just found your site thanks to FSS. I have now bookmarked it and I will be back
ReplyDeleteThanks for the great tutorial. That stamp set is beautiful, and I bought it as soon as I laid eyes on it.
ReplyDeleteWow I do love the way you've colored Tracey's sweet image! xxx
ReplyDeleteAs a newbie to promarkers this tutorial is brilliant I just love the finished project you are a very generous and talented lady
ReplyDeleteInagh
just wonderful! I love picture tutoials!!
ReplyDeleteCindy
Another great tutorial - I love all these ideas! The image is gorgeous.
ReplyDeleteLove, Andrea xx
Thanks for the great tutorial.
ReplyDeleteGreat tutorial. First time I have heard of promarkers. Thanks for the information.
ReplyDeleteWow, great tutorial. Love tutorials the here have to bookmark you a different way so i rememeber to look here more often. Traceys images
ReplyDeleteare always great too.
great tutorial as always...i pop along every friday for an update.. keep up the great work girls
ReplyDeletesylvia x
WOUW what a great tutorial here. Thanks sooo much for that Sue and also for the chance to win some amazing images as well.
ReplyDeleteAwesome Tut...and Emma is always Adorable! Thanks!!!
ReplyDeleteI love promarkers.....I used copic too...but I like how promarkers blends.....thank you for the chance to win some candy....
ReplyDeleteAs someone who is just getting into digi images and colouring this tutorial is fabulous. I really appreciate the step by step instructions, thank you.
ReplyDeleteHugs,
Shirley W
Very informative tutorial. I'm not familiar with Promarkers so will have to check into them, being the equipment junkie that I am! I need all the suggestions I can get in my quest to learn how to colour my images. I'm also happy that I have found a new site that I can learn from.
ReplyDeleteCheers and hugs,
Judy
GORGEOUS image and coloring.
ReplyDeleteThanks for the chance to win!!!
great tips thankyou very much xx
ReplyDeleteGreat Tutorial! And I love the image, too! Thanks so much for sharing!
ReplyDeleteBlessings,
Pat B
What a great tutorial and I love this little image! She is darling and what a great job of coloring!
ReplyDeleteHugs,
Lisa
muffy74sf@aol.com
Yes great tutorial and love the image too. Beautiful job coloring.
ReplyDeleteSherri Benson @ www.talentisoptional.com
Beautiful ! ! !
ReplyDeleteFAB coloring! :)
ReplyDeleteI love the tutorials! Thanks.
ReplyDeleteFabulous tutorial, love the image and also the colors, thank you.
ReplyDeletehugs,
Shirley
I am really enjoying these tutorials as I'm fairly new to using promarkers. Thank you so much for taking the time making this tutorial and explaining it in such easy to understand steps
ReplyDeleteGreat tutorial :) I understood the shading parts well
ReplyDeleteFabulous Tutorial, thank you so much. I'm learning something every single week. Suzi x
ReplyDeleteI haven't tried coloring with markers yet, don't have any, but after this, I will certainly look into getting some. TFS
ReplyDeleteFantastic Tutorial!!
ReplyDeleteAwesome coloring, TFS.
ReplyDeleteI really need help using promarkers as I am not having much success. These tutorials are very infromative and being able to see close up on clicking image is very helpful!
ReplyDelete