


Gina's still on her wee break, so I'm afraid you're still stuck with me (Debbi)for the time being, but she's like to say thankyou to all of you who have left get well messages for her.
This week we have a stunning tutorial from Helen and you'll see her image being used on her challenge card this Tuesday...
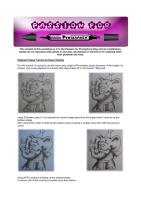
Elephant Image Tutorial by Helen
For this tutorial I'm going to use the warm grey range of promarkers purely because of the image I've chosen,this lovely elephant is a Dustin Pike digi printed off on IQ smooth 160g card .


using WG(warm grey)1 I've coloured the whole image apart from the areas which I want to be the lightest shade .
then using WG2 I start to build up the darker areas covering a smaller area than with the previous colour.


Using WG3 continue building up the shaded areas.
Continue with WG4 covering a smaller area than before.


Using WG5 colour the areas you want the darkest, remembering to make these areas slightly darker as they will lighten when the image is blended.
Using WG1 begin colouring over the image blending the colours as you go. dont be afraid to use the chisel end of the pen to blend the larger areas leaving the white areas free of ink for the time being .


once all the coloured areas are blended then go over the whole image again including the white areas.
The final picture shows the finished image the highlighted areas have been accentuated with an inkessential opaque white pen and the outline coloured with cool grey 1-5.
pop back on Tuesday to see the image on my card
hope this has been of help
hugs
helen x
We hope you find the tutorials helpful and would love to see how you get on. As always all the workshops are available in PDF format so you can print and keep them, just email me.
Coming up next week: A surprise tutorial by one of the bosses, Denise.
Hugs
Gina, Denise and the DT xx


What a fabulous tutorial Helen. x
ReplyDeleteAmazing tutorial Helen. Your image is stunning. Hugs, Denise x
ReplyDeleteThanks Debbi - no pressure then lol!
Fab tutorial - you make it look easy!! Juliex
ReplyDelete