Passion for Promarkers Copyright Notice

The design work, text, photographs and videos on this site belong to ©Passion for Promarkers and each individual designer that contributes to this site. This information is shared to inspire you. All content on this site is not to be used for commercial purposes without explicit permission.
Please do not reproduce these articles in any way, mechanical or electronic for anything other than personal use only. But you may hyperlink to any of the articles giving due credit
Thank you!

Important

Weekend Workshops are published every Friday and all are available in PDF format so you can print out and keep them.

All workshops can be downloaded by clicking the small icon at the end of each post.


..........

Friday 8 January 2010

Weekend Workshop #28

Welcome to another WW, and this time we have a masking tutorial from one of our guest designers, Sam.
So without any further ado...
 

I used card-stock from Rymans, it is Bright white coated card, which is available in 160gsm and 200gsm.  I usually use the 160gsm and it works fantastic with Promarkers.  I used Memento ink in Tuxedo Black.
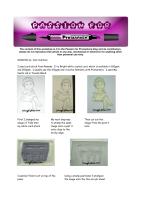
 First I stamped the Tilda image onto the card

 
My next step was to stamp the same image onto a post it note close to the sticky edge


Then cut out the image from the post it note 

I wanted Tilda to sit on top of the piano


Using a stamp positioner I stamped the piano image onto the thin acrylic sheet


I placed the stamp                    I removed the thin                    When the post it

positioner over the                   acrylic sheet containing             note is removed Tilda

stamped image of Tilda             my image and stamped            looks as though she is

so she looked as though             the piano in its place                 sitting on top of the 

she was sitting on the piano                                                                 piano.


The finished image coloured ready to go on my card...


Well, that was a super tutorial that'll work for lots of things - girls on swings, sitting on benches, chairs etc.


Next week we have an image tutorial from the fabulous Maria

Hugs
Gina, Denise and the DT xx


No comments:

Post a Comment