


Every Friday we are going to feature one digital stamp company in our tutorial and that digital company is offering a prize.
In order to be in with a chance of winning that week's prize all you need to do is leave a comment on that post - that's all there is to it.
We'd love to see you having a go at the techniques we show you in our tutorials, but it's not necessary for you to win the prize.

So to kick off our Digi Friday's we have the fabulous Soft Pencil sponsoring us, and Caryn has done the tutorial featuring one of the digi stamps from Soft Pencil - "Butterfairy"
The prize this week, for 1 lucky, randomly chosen commenter is...

Yup, that's $15 to spend on Elizabeth's gorgeous digital stamps!
So, lets get on with Caryn's tutorial - you're going to love it.
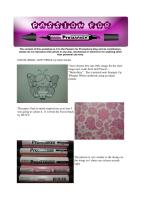
I have chosen this cute little image for the challenge next week from Soft Pencil. She is printed onto Stampin Up Whisper White cardstock using an inkjet printer.

The paper I had in mind inspired me as to how I was going to colour it. It is from the Sweet Stack by DCWV.

The pattern is very similar to the design on the wings so I chose my colours accordingly

I started by applying the palest pink all over the wings and then randomly added the other darker shades to different areas until I was happy with the effect I got.


I moved on to the hair chosing shades of yellow building up the colour and adding areas of shadow at the roots with Gold

I coloured in the whole hair area with Primrose to smooth out any hard lines.

For the skin I started with Vanilla and added depth and shadow with Satin. I gave her rosy cheeks with Blush.


Finally I used a quickie glue pen and highlighted the pattern on the wings and covered her dress finishing off with a dusting of fine crystal glitter.

Hugs,
Caryn xxx
Isn't Butterfairy just gorgeous? and Caryn has done a fabulous job with her - the glitter just finishes it off perfectly.
So, all you need to do now is post a comment - only 1 comment per person please. and we'll choose and announce the winner on next week's Digi Friday
Hugs, Denise, Gina & DT x x


What a cute image...I love how you have done the wings.....goes perfectly with the paper!!
ReplyDeleteOH! Super cute image. I learn so much from these workshops, I just wish I could make my images look as good as you girls
ReplyDeleteMaree
Great tutorial, i love digi stamps so really looking forward to these workshops. xxx Carol
ReplyDeleteWhat a beautiful buterfairy, the glittery dress works so well... almost like fairy dust
ReplyDeleteSammy xxxx
Wow I STILL don't have all the colours but love the tutorials they are so helpful and this is a lovely image xx
ReplyDeleteCute image and I love the way you have coloured her goes perfectly with the paper.
ReplyDeleteJane
x
such a cute image and beautifully coloured, and I love the glitter!
ReplyDeleteI was wondering, is it possible to get the Letraset colour numbers (that correspond with the Tria Markers) for the older ProMarkers? I see the newer ones are numbered as well as given names and it would be helpful to add a couple of Trias to my collection, but I don't want to duplicate and the colour chart isn't too clear .. .. Unfortunately my email to Letraset bounced back so I'm hoping you might be able to ask them.
hugs, annie x
Sooo cute. The glitter enhances it all!! I always come over to here if I am stuck with colouring, the tutorials always help :)
ReplyDeleteGreat tutorial and cute image. Love the pink wings. These colouring tutorials are very helpful.
ReplyDeleteSirpa
I love all the tutorials you share with us. The image and colouring looks so cute.
ReplyDeleteShe is so sweet. and I love how the paper matches her wings.VERY clever! And what a gr8 prize too!
ReplyDeleteHugs VEE
Great tutorial and I am just starting to use digi stamps so this was ideal for me. Just got my promarkers so I am on a new learning curve.
ReplyDeleteMarion
Just found your blog, what a great tutorial
ReplyDeleteClaire xx
such a cute iamge-and such detailed wings-great for colouring! mary g
ReplyDeletegreat image, love the pink wings and fab tutorial thank you
ReplyDeletehugs shell xx
Great tutorial, as always. I have learned everything I know (still a long way to go!) from your tutorials! Keep up the good work.
ReplyDeleteI also love digital stamping - so versatile.
Wonderful tutorial, I'm fairly new to ProMarkers, (still learning) but these instructions are easy to follow. Love the cute image too.
ReplyDeleteHugs Suzi xx
Thanks for a great tutorial Caryn. Hugs, Squirrel xx
ReplyDeleteGreat tutorial. I have never used a digistamp so far. Will have to give it a go
ReplyDeleteSo cute. You finished the card off beautifully. xx
ReplyDeleteFor a ProMarker-a-holic, any tips & advice & inspiration is invaluable! Thank You X
ReplyDeleteOh wow this is so cute I love those coloures and all the glitter is fab :D
ReplyDeleteHugs
Amy xx
Such a sweet little butterfly/fairy, Caryn! I like the added glitter.
ReplyDeleteThe glitter just makes it! Thanks for the tutorial.
ReplyDeleteGreat tutorial, thanks! Love that glittery look;-))m
ReplyDeleteThanks for the great tutorial!!
ReplyDeletethanks Caryn for your great tutorial......you coloured the image so wonderful.......especially the wings.....I've learnt a lot!
ReplyDeletexxx Margreet
This image is so cute, and Caryn's colouring is fab - really love the glittering! Thank you for the tutorial - I find them so helpful as I am very new to Promarkers and I have lots to learn with the colouring.
ReplyDeleteLove, Andrea xx
What a cute image Caryn, i love how you've coloured her too.
ReplyDeleteHugs Tracy x
Oh so pretty, such a lovely digi and I adore the colours used on her.
ReplyDeleteThanks for a great tutorial and a chance to win a great prize too
Jan xx
wow great tutorial love how you have done her dress too,she looks brilliant hugs cheryl xxx
ReplyDeleteand bless you guys for chance to win too
Great image and brill tutorial.
ReplyDeleteSylvia x
wow what a beauty thankyou for the tutorial i found it really helpful as i needed help with shading hair on my images this has been very inspiring for me so thanks hun xx
ReplyDeleteYou colored her beautifully ~ love how the wings turned out!
ReplyDeleteWOW!!! I absolutely love how you've done the wings!! I will definately be trying something like this x x x
ReplyDeletethe image is sooo cute!! and all that glitter is fabulous..love,love, LOVE it!!
ReplyDeleteThanks for another great tutorial! Love the image she is so sweet!
ReplyDeleteHugs Lynsey x
Wonderful colouring!! I simply love all your workshops, and I struggled quite much with the PMs before I found your fab workshops and learnt how to handle them :-)
ReplyDeleteWAAU thats ser så godt - jeg bare elsker at sommerfuglen pige .....
ReplyDeleteJeg tror du fyre gør det bedste tutorials .....
have a nice weekend
Very sweet...love the glitter!
ReplyDeleteGreat Turtorial Caryn and the little fairy is well cute.
ReplyDelete(hugs)
Trish (-:
Thanks for the tutorial. I have only just started with digi stamps so will be interested to see what else there is.
ReplyDeleteLucyx
Wow your colourimg is amazing, if only I could do it half as good I would be thrilled!!! Thank you so much for a fabby tutorial and the chance to win a wonderful prize, love the image used in the tutorial x
ReplyDeleteThis is so sweet ! Soon I'm off to London to buy more ProMarkers, I can hardly wait !!
ReplyDeleteWhat a cute image...really love the colours you've chosen. I've not used digi stamps yet. These tutorials are so helpul. Thanks for a chance of winning.
ReplyDeleteSuch a little sweetie. Thanks for the "lesson".
ReplyDeleteHugs,
Marie
Fabulous image and lovely colouring, great to see exactly how it's done.
ReplyDeleteJenni x
wow I love the wings, it just works gr8, I would have tried to match it too much, you have got it just right, well done
ReplyDeleteWOW!! I am very VERY new to promarkers and fairly new to stamping in general - and I LOVE THIS BLOG!!
ReplyDeleteI made my very own baby blog yesterday, as I'm quite a technophobe that was quite a feat for me! And guess what?! This blog is already listed under my faves and blogs to follow. :-)
I got my very first ever sets of promarkers today, and I feel sooh excited to be trying them FINALLY!! Have been covetting them for months now! hehe.
This weekend workshop is so inspiring and I will be visiting often.
Thank you to all of you who make this happen.
Karen.
xxx
What a cute stamp, I have never joined in the workshop tutorials before (being a new member) but this stamped image and the tutorial is so clear and easy to follow that I am going to have a go and hope I achieve a similar effect as I love the shading of the wings and hair,
ReplyDeleteJune
Just got my first pack of PMs and still very unsure about how to get the best results. Descovered your tutorials earlier this week and have been reading back through ALL of them! I'm learning so much- thank you!
ReplyDeleteNot really got into digi as I always worry about smudging the inkjet ink as, up until now all my colouring was water based. Am I right in thinking that PMs don't smudge? -they don't look to in these pictures. Any tips greatfully received!
I LOVE this image, thanks for the tutorial, i especially like how you choose your colours before even starting to colour... this is something i have to work on@
ReplyDeletethank you
Penny Busch
lovely image so sweet and great tutorial x
ReplyDeletei found this tutorial really useful, especially for the facial skin tones, thank you for this and what a cute image to be working with.
ReplyDeleteGreat tutorial and super cute digistamp!
ReplyDeleteWhat a fab tutorial...
ReplyDeleteSuch a cutie image i love working with digi stamps...
The paper is so gorgeous two and the colour combo is brilliant.
Thanks for this great tutorial it's nice to know we have some where to come if we get stuck.
Hugs Alison.
xx
fabulous tutorial..love all the shades of pink..how cool is that
ReplyDeleteSuch a good idea to use glitter like that. I've just got a load of fairy stamps so I can't wait to try that technique out. Thanks!
ReplyDeleteDigi Friday! What a great name. Im quickly becoming a digital stamp addict!! Caryn, Thank you for the great tutorial and showing the highlighting technique you used on her hair. I find that to be my biggest challenge when coloring.
ReplyDeleteThe butterfly is absolutely adorable and who could resist a sparkly pink butterfly!?! You did a fantastic job.
Thanks for the tips and I am looking forward to next Digi Friday.
Thanks,
Andrea
With tutorials like this there's hope for me yet, she's gorgeous thanks for sharing Julye
ReplyDeleteSo pretty. Thank you for this tutorial.
ReplyDeleteThank you - I love Soft Pencil images, your tutorial was great! :)
ReplyDeletereally pretty, thanks for the tutorial x
ReplyDeletegreat tutorial, i may have to invest in a quickie glue pen too!
ReplyDeleteWhat a great workshop - love the new digi addition! Looking forward to having a go...
ReplyDeleteMaz H x
she looks gorgeous, this sounds like a fab idea, see you next week :)
ReplyDeleteGreat tutorial and those images are just sooo cute :)
ReplyDeleteJust love your tutorail. Thank you for sharing.
ReplyDeleteThabk you for the chance to win:)
Thank you for sharing your talent I love the sparkly dress so cute xx
ReplyDeleteGreat tutorial,I just love digistamps:)
ReplyDeleteGreat tut. I've never used a digi image before but I will now, I've seen some great ones I must have. : )
ReplyDeleteSue
Yet another fab tutorial. I love her wings they are gorgeous.x
ReplyDeleteGreat tutorial! I love using digi images, they are one of my fave things to use as you can size them to suit. I look forward to seeing more of them here!
ReplyDeleteHugs
Anj
xx
very cute and your tutorials are invaluable to a PM beginner like me - thanks!
ReplyDeleteOMG, how precious! Fabulous tut! and love the final glitter dusting! xxD
ReplyDeleteYour colouring is really good, you make it look so easy. Thanks for the tutorial.
ReplyDeleteButterfairy is SO cute...Caryn has indeed done a fabulous job with her :-)
ReplyDeleteGreat tutorial & great work Caryn...Thank you x
Great to find some help on ProMarkers - love mine!
ReplyDeleteI love how you did the wings. Gave her a real groovy fairy feel!! Going to truths technique myself x
ReplyDeletereally cute! running to get my promarkers..
ReplyDeletei love using Digi stamps with my promarkers. looking forward to seeing more
ReplyDeleteBeautifully coloured, I love all the shades of pink and the glittered dress is such a lovely idea.
ReplyDeletePinky
O she's just beautiful! Love the colour combo & sparkle :D x
ReplyDeleteGreat tutorial Caryn, love the image and the colours you used, Keep up the good work!
ReplyDeletesue@kajs.demon.co.uk
im fairly new to promarkers, had the skintone for a while but now got more colours, need more though lol, that image is fab,
ReplyDeletelooking forward to learning how to use these promarkers to good effect. x
Great tutorial! I enjoy working with digi stamps! Love being able to resize!!
ReplyDeleteStunning tutorial and I love how you have done the wings .. going to have a go at that myself!
ReplyDeleteThanks for the tutorial.
Cathy xx
Thank you for the tutorial I have only just started using promarkers so all advice is welcome.xxx
ReplyDeleteAwww WOW!! This is exciting, new challenges and more prizes. Always luv your tutorials they have so helped me improve my colouring skills and the tips have been invaluable. Look forward to Fridays for the tutorials. Keep them coming lol! Luv Carol xxx
ReplyDeleteOh, what a cute image! And a really good tutorial too!
ReplyDeleteWhat a gorgeous image! And the touches of glitter make it look so magical! Well done xx
ReplyDeleteFab tutorial! The image is gorgeous - I shall be looking into getting some of these Digi Stamps. x
ReplyDeleteNice digi image and great tut as always! I learn so much from these workshops! You are simply the BEST! Thank you SO MUCH! ♥♥♥
ReplyDelete