


This week there will be a candle tutorial by me (Gina) and also a tutorial on how to link your cards, we know this is nothing to do with PM’s but so many of you have asked how to do it so Sarah and done a great tut for you to follow
******************
Linking your challenge entries by Sarah
Ok, so it’s got nothing to do with Promarkers but a few of you have requested help with linking your challenge entries, I know I struggled with it when I first started blogging, so the Design Team at Passion for Promarkers thought we would try & lend you a hand so here goes:
Lots of challenge blogs including ours request that you link to your post & not your actual blog; this makes it easier for the DT & other bloggers to find the relevant post, so I think we will start here:
1. Create your post as normal & publish
2. Click on the title of the post that contains the card you are trying to link so mine is titled Passion for Promarkers, Just Magnolia & Simon Says Stamp……phew that’s a long one. Once that is done your blog will display only the selected post
3. Next, highlight your address bar, right click your mouse & select the copy function from the drop down menu (pic below)

Ok, now I have all the info I need from my blog to enter it into the challenge
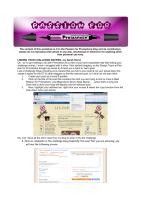
4. Click on comments in the challenge blog (hopefully this one) that you are entering; you will see the following screen:

5. Type what you would like to say about this weeks challenge, DT cards etc then you are ready to create your link. The string below is the code used to create the automatic link.
<a href=”URL”>Here’s my entry</a>
you are just going to put your info in as follows:
Delete the words URL, including the quotation marks, paste the URL copied from your address bar in its place by placing the cursor next to the = sign, right click on the mouse & select paste, so you see following (obviously your URL will read differently to mine)
<a href= http://lil-paper-pixie.blogspot.com/2009/08/passion-for-promarkers-just-magnolia.html>Here’s my entry</a>
So my post would read something like this before its published:
Great inspiration from the DT, I really enjoyed this challenge <a href= http://lil-paper-pixie.blogspot.com/2009/08/passion-for-promarkers-just-magnolia.html>Here’s my entry</a>
Thanks for looking
Hugs
Sarah
6. To test that this will work, instead of clicking Publish, click on preview instead

You can see from the picture above that my link has worked & all I need to do is click publish.
I hope you find this helpful, any questions please feel free to ask the PFP team
******************
Candle Tutorial by Gina
Ok this is my first tutorial so please be gentle :)
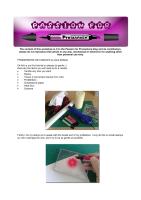
Here are the items you will need to do a candle
Candle any size you want
Stamp
Tissue (I use tempo tissues from Lidl)
ProMarkers
Greaseproof paper
Heat Gun
Scissors

Firstly I Ink my stamp so to speak with the broad end of my proMarker, I only do this on small stamps so not to damage the end, and I try to be as gentle as possible

Next get a tissue and flatten as much as possible, stamp the image as you would normally, but do take care when removing the stamp as it does tend to stick, so be very careful, if you do miss any you can always touch it up with the PM but still be very gentle

When you have all of your images stamped, cut around the edge as close as you can, if some of the layers from the tissue fall off this is ok, so long as you have the top layer

Place the image onto the candle in the position you want

Now you get a piece of greaseproof paper and wrap it around the candle making sure you do not move the image,

Now this is the awkward bit, if you can keep hold of the candle with one hand and then get your heat gun in the other, then heat up the stamped area until you see it melt, if you see on the photo below there is a shadow around the edge of the flower and the flowers colour is a lot brighter than on the photo above, this shows that the image has melted into the candle

Now peel the greaseproof paper away carefully, if there is some of the image that is not melted into the candle place the paper back and heat again

I placed some more of the flowers onto my candle and added stalks and below is the final result, you can make it as plain or as fussy as you like, it also works with a image done with memento ink and then coloured with ProMarkers

Hope you have enjoyed my first tutorial and that I have not bored you all silly, if you do make any candles we would love to see your results :)
Hugs Gina xxx
******************
Well that’s it for this week, I hope you enjoyed them. If you have any ideas or would like this weeks tutorial please email me here, please be patient with me, I am so far behind with getting the tutorials out to everyone, as I said last week if I don’t get yours too you just give me a reminder and I will do it right away :)
Hugs Gina, Denise and Design team xxx


No comments:
Post a Comment