


You'll have to wait until Tuesday to see the image made up into a card, and I hope you like what I've done.
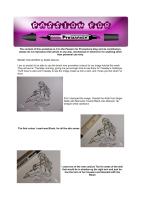
 First I stamped the image, Claudia the Artist from Sugar Nellie with Memento Tuxedo Black onto Stampin' Up whisper white cardstock
 The first colour I used was Blush, for all the skin areas
 I used on of the new colours Tan for areas of the skin that would be in shadow eg the right arm and just below the hem of her trousers and blended with the Blush
 I then coloured her trousers with another of the new colours, Mulberry, using a small circular motion
 I then added Plum to the areas of her trousers that would be in shadow and blended with the Mulberry.


 For her top I used Orchid, again colouring it with small circular movements
 I have added Purple to the areas that would be darkest, then blended
 Moving onto her belt/scarf, I used Pink Carnation to colour the whole area. I then used Fuchsia Pink for the shadows and blended again with the Pink Carnation (2 pics below)

 Moving onto her hair I used yet another of the new colours, Caramel. I coloured the areas that I wanted highlighted, where I imagined the light would hit.
 The second colour I used for the rest of her hair was Walnut.
 I blended this very lightly with the Caramel, I left the effect quite rough, to make it look like it has more texture.
 The I added Umber to the areas that wouldn't get any of the light e.g. the underneath of the hair on her right, the roots and ends.
 Again I blended this with the Caramel, roughly for more texture.
 For her accessories, bracelets, earrings etc I used Cerise. Then added Magenta from the old colours for the areas in shadow (pic below)


Debbi you left a comment on my blog big thanks for it. One question how do I print it out? Looked for the PDF link but cant find it and I love to learn to colour as you and the other DT does.
ReplyDeleteoxo Ildiko
Can't get the link up to the e-mail Debbie so here is mine feherhattyu@yahoo.co.uk may I have the PDF file for the work shops ppl ppl pls pretty ;-)
ReplyDeleteHuggs Ildiko