


******************
Watermark Tutorial by Helen
We’ve had a few questions about creating your own watermark/signature so I thought I’d show you how I do it.For this I use a program called gimp which is available free from here http://www.gimp.org/
This is how I use it

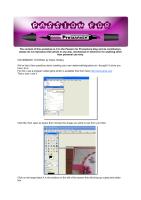
Click file, then open as layers then choose the image you want to use from your files

Click on the large black A in the toolbox on the left of the screen this will bring up a gimp text editor box

Move the mouse curser over the image and click and drag out a box the size you want the text to be then type your text into the
Gimp text editor box. then click on the close button.
On the left hand side tool bar use the text tools to choose the font and font size you want and the colour you want your text to be. I use white as it is neutral
But that’s just my preference.

On the right hand tool bar as shown above drag the opacity bar to the left and this will fade out the text on your image play around until you get the level you like.
Once you are happy with this click on SAVEAS as you would usually, then this box should open

Click on Export then this box should open

Click Save.
And there you have your finished signature/watermark.
Hope this is helpful
Hugs Helen x
******************
Flower #2 Tutorial by Michele
Hi there me again with another flower tutorial for you.
Here is a list of the items that I've used to make up this flower.

Sizzix Flower Layers Die or any 5 petal shaped die/punch will do
1 large bead
Apricot ProMarker pen (again any colour will do)
For this particular flower I've cut out the 3 smallest flower shapes twice

On the back of each flower, roughly draw a circle in the centre

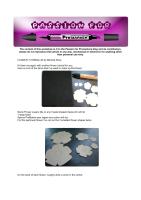
For each flower cut down the sides of each petal until you reach the circle you drew earlier (pic 1, pic 2, pic 3)
Now keep cutting down each petal until they resemble pictures 4, 5 and 6

Now on the right side of your flowers, draw a line starting from the centre outwards with your ProMarker pen on each of the tiny petals.

Now on the wrong side of each flower, start embossing each petal until they resemble the pictures 1, 2 and 3.

Now on the right side of each flower, emboss the centre till it resembles the picture to the left.

Pop on the back of 5 flowers some PVA glue and then start layering them up. To finish the flower off, put some PVA glue in the centre and place the bead in.

This is what the flower should look like in the end. For a bit of sparkle, I've used spray adhesive and Making Memories Scrapbook Shimmer Spotlight.

And this is what it will look like on your card.
I hope you've enjoyed this tutorial and I look forward to seeing your creations.
Hugs Michele x
****************
Well that is it again for this weeks Weekend workshop, hope you are still enjoying them, please feel free to leave any comments or ideas for future tutorials of what you would like to see :)
Hugs Gina, Denise and Design Team xxx


No comments:
Post a Comment